

Ceilings
Tongue and Groove Plank Ceiling - Inspiration for Modern Homes
03.17.2026
03.17.2026
In This Article
Few architectural details bring as much warmth, texture, and character to a room as a tongue and groove ceiling. Once reserved for rustic cabins and country cottages, this classic plank treatment has been fully embraced by contemporary designers who are painting it, staining it, and scaling it in unexpected ways. Whether you're installing tongue and groove ceiling planks for the first time or looking for modern tongue and groove ceiling ideas to refresh a space you already love, the nine rooms below prove just how versatile this material can be.
From soft blush breakfast nooks to moody vaulted bedrooms, each example offers a different take on the same fundamental technique—interlocking wood planks that create a seamless, linear surface overhead.
![[Image 1: Blush pink breakfast nook]](https://www.blockrenovation.com/hs-fs/hubfs/u5821215421_A_breakfast_nook_photographed_from_a_seated_persp_feb1cf1b-4065-440d-85cf-5519b33106eb_2.png?width=1024&height=1024&name=u5821215421_A_breakfast_nook_photographed_from_a_seated_persp_feb1cf1b-4065-440d-85cf-5519b33106eb_2.png)
One of the simplest ways to give a tongue and groove ceiling a modern edge is to paint it the same color as the walls. When a single hue wraps from ceiling to wall, the room feels taller, more intentional, and surprisingly spacious—even in a compact space like a breakfast nook or sunroom. Soft, muted tones like blush, sage, or warm clay work especially well because they add personality without overwhelming the plank texture underneath.
A pendant light or simple fixture dropped from the center of a color-drenched planked ceiling provides just enough contrast to keep things interesting.
Running the boards parallel to the longest wall draws the eye outward, which is a particularly useful trick when installing tongue and groove ceiling planks in smaller rooms.
![[Image 2: White painted living room]](https://www.blockrenovation.com/hs-fs/hubfs/u5821215421_A_bright_airy_living_room_with_white-painted_tong_2d35bd66-e414-4040-9c91-48ae0ed6255e_3.png?width=1024&height=1024&name=u5821215421_A_bright_airy_living_room_with_white-painted_tong_2d35bd66-e414-4040-9c91-48ae0ed6255e_3.png)
If you want the texture of real wood without the visual weight, a white-painted tongue and groove ceiling is the most reliable choice you can make. The fine shadow lines between each board give the surface a subtle rhythm and dimension that flat drywall simply cannot match, while the white finish keeps the room feeling bright and open.
This is one of the most popular modern tongue and groove ceiling ideas for good reason: it works in virtually any room, any style, and any climate. For the cleanest result, use a high-quality primer and two coats of semi-gloss so the planks are easy to wipe down—especially important for a tongue and groove kitchen ceiling where grease and steam are part of daily life.
![[Image 3: Warm honey-toned bedroom]](https://www.blockrenovation.com/hs-fs/hubfs/u5821215421_A_cozy_bedroom_with_warm_honey-toned_tongue_and_g_57085221-6e4f-43ef-bbbe-50c36f7ec2ee_0.png?width=1024&height=1024&name=u5821215421_A_cozy_bedroom_with_warm_honey-toned_tongue_and_g_57085221-6e4f-43ef-bbbe-50c36f7ec2ee_0.png)
There's a reason natural wood ceilings keep appearing in bedrooms, guest rooms, and retreats: the warmth of unfinished or lightly sealed planks overhead instantly makes a space feel cozy and grounding. Honey and amber tones glow beautifully in natural light and pair well with linen textiles, rattan accents, and collected gallery walls.
When installing tongue and groove ceiling planks in natural wood, consider the species carefully. Pine and cedar are popular choices that develop a rich patina over time. A clear satin polyurethane protects the boards while letting their grain speak.
Pairing warm wood overhead with cooler whites on the walls prevents the room from feeling too enclosed.
![[Image 4: Modern kitchen with dark cabinets]](https://www.blockrenovation.com/hs-fs/hubfs/u5821215421_A_dramatic_modern_kitchen_with_matte_black_painte_528b87c0-dc90-439a-a6af-98a24f8034a3_2.png?width=1024&height=1024&name=u5821215421_A_dramatic_modern_kitchen_with_matte_black_painte_528b87c0-dc90-439a-a6af-98a24f8034a3_2.png)
A tongue and groove kitchen ceiling doesn't have to match the cabinetry below—in fact, some of the most striking kitchens use the ceiling as a deliberate counterpoint. Light natural-wood planks overhead balance bold, dark cabinetry and keep a high-contrast room from feeling heavy or cave-like. The warm tone of the wood draws the eye upward and gives the whole space a sense of lift.
This approach works anywhere you've committed to a moody palette on the walls or lower surfaces. Open shelving, brass hardware, and butcher-block surfaces can bridge the gap between the dark lower zone and the pale ceiling, tying the two together seamlessly.
![[Image 5: Dark stained vaulted bedroom]](https://www.blockrenovation.com/hs-fs/hubfs/u5821215421_A_full_room_shot_of_a_moody_modern_bedroom_with_a_536b641c-b54f-4c68-9362-ba3b3fb78dac_1.png?width=1024&height=1024&name=u5821215421_A_full_room_shot_of_a_moody_modern_bedroom_with_a_536b641c-b54f-4c68-9362-ba3b3fb78dac_1.png)
A tongue and groove ceiling doesn't have to be light to be beautiful. Deep charcoal or ebony stains on vaulted planks create a cocooning, intimate atmosphere that works especially well in remodeled bedrooms.
Against a dark overhead surface, white bedding, pale lamps, and textured throws practically glow, creating a striking contrast that feels both luxurious and modern.
Keep in mind that dark-stained tongue and groove ceilings work best in rooms with generous ceiling height or vaulted architecture. The extra volume prevents the space from feeling compressed. If you have standard eight-foot ceilings, consider a lighter stain that still reads as rich without closing the room in.
![[Image 6: Dark walnut dining room]](https://www.blockrenovation.com/hs-fs/hubfs/u5821215421_A_modern_dining_room_with_dark_walnut-stained_ton_2be1a6a4-f2a0-49ed-b0d3-a1fc2d3b5cdd_3.png?width=1024&height=1024&name=u5821215421_A_modern_dining_room_with_dark_walnut-stained_ton_2be1a6a4-f2a0-49ed-b0d3-a1fc2d3b5cdd_3.png)
In open-plan homes where walls are few, a tongue and groove ceiling can serve as a powerful tool for defining different living zones. A dark walnut planked ceiling over the dining area, for example, visually separates it from the kitchen or living room without the need for partitions. The change in material and tone overhead signals a shift in function and mood.
Pairing a darker ceiling with white walls below keeps the overall room bright while giving the defined zone a sense of intimacy. Sculptural pendant lighting, like a paper lantern or oversized globe, becomes a natural focal point when silhouetted against the rich wood above.
![[Image 7: Gray-stained arched den]](https://www.blockrenovation.com/hs-fs/hubfs/u5821215421_A_small_den_with_gray-stained_tongue_and_groove_c_c253743c-a4a7-4106-babe-ab7e18a9b489_0.png?width=1024&height=1024&name=u5821215421_A_small_den_with_gray-stained_tongue_and_groove_c_c253743c-a4a7-4106-babe-ab7e18a9b489_0.png)
Tongue and groove planks aren't limited to flat surfaces. When applied to arched or barrel-vaulted ceilings, the linear boards accentuate the curve beautifully, turning an architectural feature into the undeniable star of the room. A weathered gray or driftwood stain enhances the organic shape and pairs well with eclectic, vintage-influenced interiors.
Installing tongue and groove ceiling planks on a curved surface requires additional blocking and patience, but the payoff is enormous. A tongue and groove bathroom ceiling with an arched profile could create a spa-like atmosphere, while the same treatment in a den or reading room adds instant character.
![[Image 8: Soaring gothic-arch vaulted ceiling]](https://www.blockrenovation.com/hs-fs/hubfs/u5821215421_A_towering_vaulted_tongue_and_groove_ceiling_in_p_e6d6ae23-43f3-4c02-be66-5f3f9280c2fc_2.png?width=1024&height=1024&name=u5821215421_A_towering_vaulted_tongue_and_groove_ceiling_in_p_e6d6ae23-43f3-4c02-be66-5f3f9280c2fc_2.png)
When you have soaring cathedral ceiling height to work with, tongue and groove planks can reach their full architectural potential. Running the boards from the base of the walls to the peak of a vaulted roof creates one unbroken sweep of wood that makes the structure itself the focal point. A pale, natural finish amplifies every inch of height and keeps the massive surface feeling airy rather than heavy.
Modern light fixtures—like sputnik chandeliers or sculptural pendants—hung at staggered heights add a contemporary layer to the traditional plank work. Stone or plaster accent walls at the base help anchor the soaring wood above and prevent the room from feeling ungrounded.
![[Image 9: Urban loft with brick and reclaimed wood]](https://www.blockrenovation.com/hs-fs/hubfs/u5821215421_An_urban_loft_with_wide-plank_natural_pine_tongue_38e6387a-4851-4c5d-ba2a-a8915fe7728b_0.png?width=1024&height=1024&name=u5821215421_An_urban_loft_with_wide-plank_natural_pine_tongue_38e6387a-4851-4c5d-ba2a-a8915fe7728b_0.png)
For lofts, industrial conversions, and any space where you want a sense of history, reclaimed tongue and groove boards add a layer of soul that new lumber can't replicate. Visible nail holes, knot variations, and the natural patina of aged pine tell a story overhead while bridging the gap between raw architectural surfaces—like exposed brick or concrete—and polished furnishings below.
Beyond the aesthetic appeal, a reclaimed tongue and groove ceiling also offers practical acoustic benefits. Wood planks soften sound reflections that hard surfaces tend to amplify, making a loft or open-plan space feel quieter and more comfortable to live in.
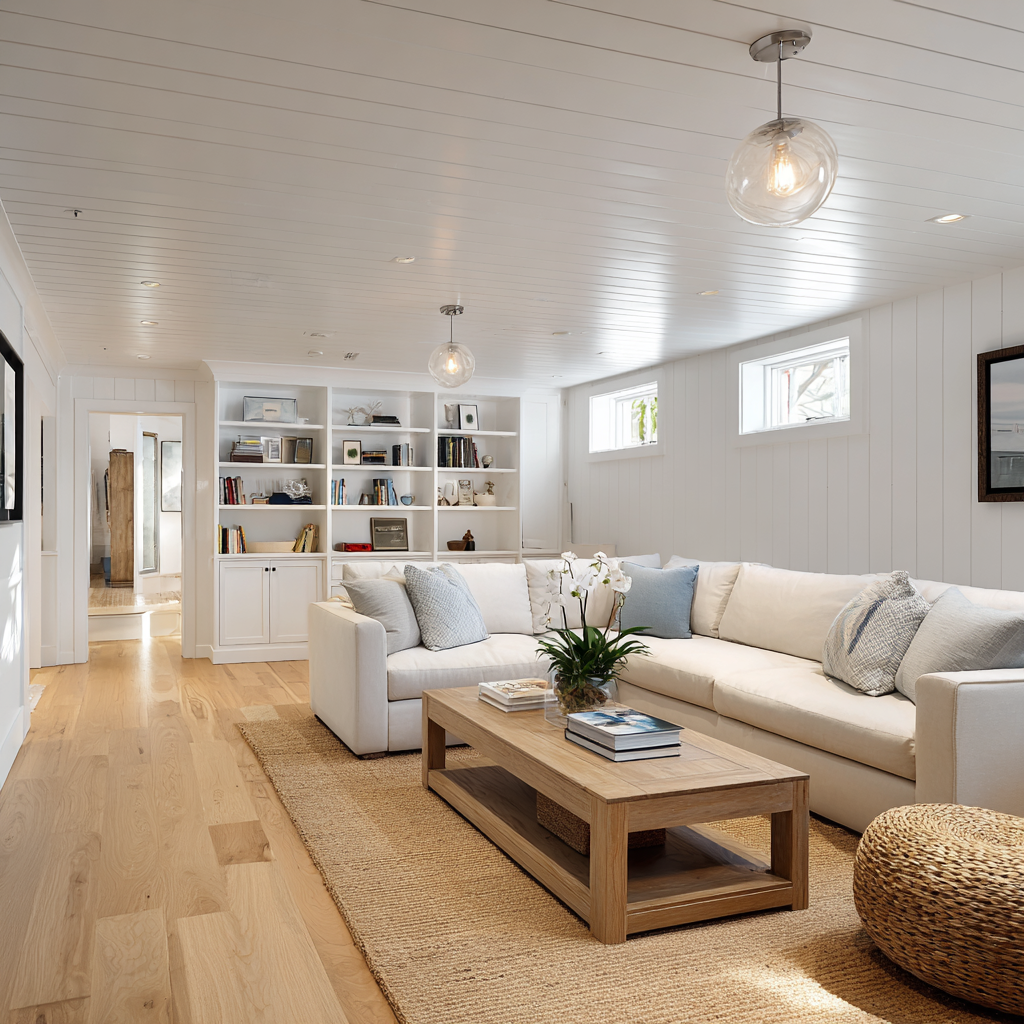
A tongue and groove ceiling is one of the fastest ways to make a basement feel like a real room rather than an afterthought. White-painted planks installed directly to the joists sit tighter to the framing than a drop-ceiling grid, preserving every inch of headroom while bouncing light around a space that needs it most. Running the boards toward the main light source—a window wall or walkout door—makes a low basement ceiling feel longer and more open.
Moisture is the main consideration below grade. Make sure the space is properly waterproofed, keep humidity below 50% with a dehumidifier if needed, and choose a moisture-tolerant species like cedar or prime the boards with a mold-resistant coating before installation.
Common softwoods like pine, cedar, and poplar run between $2 and $7 per square foot. Premium hardwoods such as walnut or white oak push that range to $8 to $15 per square foot. Reclaimed wood varies widely by source and condition, but typically carries a 20% to 50% premium over comparable new lumber.
For a standard 12-by-14-foot room—roughly 168 square feet—that means approximately $350 to $1,200 for softwoods and $1,350 to $2,500 or more for hardwoods.
Labor typically adds $3 to $6 per square foot, covering joist preparation, plank fitting, nailing, and basic trim. Vaulted, arched, or cathedral ceilings land at the higher end due to scaffolding, angled cuts, and added complexity. A flat ceiling in a bedroom or kitchen is the most affordable scenario.
Prep work is the line item most people overlook. If your existing ceiling has popcorn texture, damaged drywall, or insufficient joist spacing, you may need to skim-coat, add furring strips, or reinforce the framing before planks can go up. Furring strips typically add $1 to $2 per square foot but ensure a flat, stable surface that makes the rest of the installation far smoother.
A tongue and groove ceiling can completely redefine the look and feel of a room, but getting the details right—from material selection to installation to the finishing touches—makes all the difference between a weekend project and a space that truly feels designed. That's where Block Renovation comes in.
Block Renovation takes the guesswork out of your next home renovation by matching you with vetted contractors, helping you navigate material choices, and keeping your project on track from first plank to final coat of finish. Whether you're envisioning a simple white-painted ceiling in the kitchen or a dramatic stained vault in the primary bedroom, their team ensures the process is as seamless as the planks themselves.
Remodel with confidence through Block

Connect to vetted local contractors
We only work with top-tier, thoroughly vetted contractors

Get expert guidance
Our project planners offer expert advice, scope review, and ongoing support as needed

Enjoy peace of mind throughout your renovation
Secure payment system puts you in control and protects your remodel


Renovate confidently with Block
Easily compare quotes from top quality contractors, and get peace of mind with warranty & price protections.
