How to
Small House Renovations: Solutions for Limited Space
07.02.2025
03.12.2025
In This Article
Tiling a bathroom floor can feel daunting, especially if you're unsure where to begin. You may have tackled home projects before, only to face challenges like uneven tiles, incorrect spacing, or trouble cutting tiles around fixtures. Or perhaps you're ready to replace outdated or damaged tiles but feel overwhelmed by the idea of doing it yourself. From ensuring precise tile placement to avoiding costly mistakes, you're probably seeking straightforward guidance. This guide breaks down the process step-by-step, helping you confidently tackle your bathroom floor tiling project—whether you decide to DIY or hire a pro.

Tiling a bathroom floor is not just about laying down tiles—it involves careful planning and execution to ensure longevity, aesthetics, and functionality. Here are the top three factors to consider when doing on this project:
A well-prepared subfloor is essential for tile longevity. Make sure that the subfloor is level, clean, and free from damage. Use leveling compounds on uneven surfaces and consider moisture-resistant backer boards on wood subfloors to prevent water damage and ensure a stable tiling surface.
Plan your tile layout carefully to maximize aesthetic appeal and minimize cuts. Start tiling from the most visible areas and use tools like a chalk line for precise alignment. Dry-fit tiles first to check the layout and make necessary adjustments before applying adhesive.
Choose the right tools and materials for effective tile installation. A notched trowel will help apply the correct amount of thinset, while tile spacers ensure even spacing for a uniform grout line. Select the appropriate thinset and grout type for your specific bathroom conditions to enhance durability and ease of maintenance.
Tiling a bathroom floor involves several costs, primarily influenced by the size of the bathroom, the type of tiles chosen, and the complexity of the job. Typically, the cost to tile a bathroom floor can range from as low as $300 for smaller bathrooms using budget materials, to over $3,200 for larger bathrooms with high-end materials. That’s why it’s always a good idea to get multiple estimates and ensure you understand all the factors that could affect the final cost.
Tools and Materials You Need to Tile a Bathroom Floor
Before going through the steps on how to tile your bathroom floor, let’s look at the necessary tools and materials you should gather. Missing even one of these might prevent you from completing the project, so it’s best to check all the boxes we've listed.
|
Tools Required
|
Materials Required
|
|
4-in. diamond blade
Angle grinder Bucket Caulk gun Chalk line Cordless drill Drill mixer Drywall saw Dust mask Grout float Knee pads Margin trowel Nippers Notched trowel Offset saw Putty knife Safety glasses Scoring knife T-square Tape measure Tile cutter Utility knife Wet saw |
#12x2" stainless steel screws
1/4-in. tile backer board 1x4 guide boards 2-1/2- galvanized screws Acrylic additive Alkali-resistant mesh tape Backer board screws Backer rod Construction adhesive Duct tape Sanded caulk Sanded grout Silicone caulk Thin-set mortar Toilet extension ring Transition threshold Wax ring |
Now that you've checked through each item on the list, let's go through how you can properly tile a bathroom floor.

When it comes to tiling a bathroom floor, mastery involves precision, the right tools, and a methodical approach. Here's a detailed guide to help you achieve professional results, integrating key tips and materials to ensure your project goes smoothly.
Accurate measurements are fundamental. Use a tape measure to determine the square footage of your bathroom. Add 10% for cuts and mistakes. This ensures you have enough tiles and supplies to finish the job without interruptions. Don't forget to check the size of your tiles to calculate the appropriate grout spacing.
Tape measure, T-square.
Lay down the 1/4-inch backer board to create a solid base for the tiles. Cut the sub-flooring using a scoring knife or a drywall saw, ensuring to account for any fixtures or plumbing. Backer boards prevent moisture damage and tile movement. Use alkali-resistant mesh tape along the seams to strengthen joints before securing with screws.
Scoring knife, drywall saw, cordless drill, alkali-resistant mesh tape, backer board screws.
Secure the backer board to the subfloor with 2-1/2” galvanized screws, ensuring a screw every 6 inches along the edges and across the board. This provides stability and prevents any future tile cracking due to movement. Remember to leave a 1/8” space between the sheets and the walls for expansion.
Cordless drill, galvanized screws.
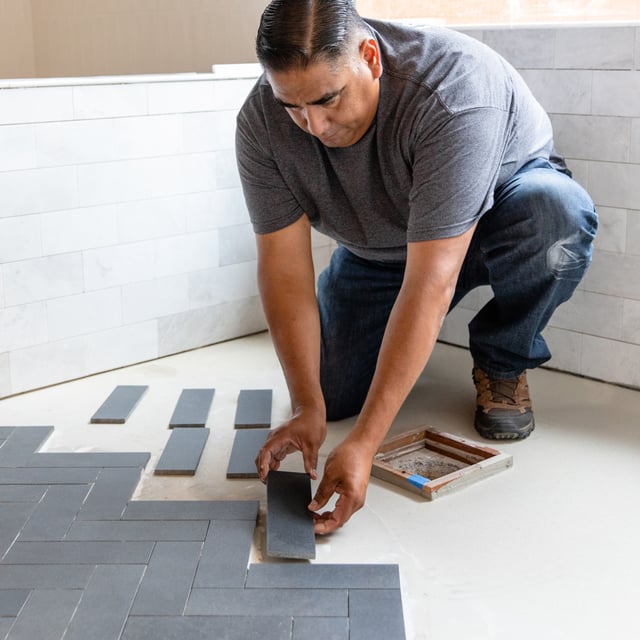
Before applying any adhesive, dry-lay your tiles to test the layout. Start from the center of the room or the most visible area to ensure symmetry. Adjust the layout as needed to avoid narrow slivers of tiles near the walls or fixtures. Use a chalk line to mark reference lines, ensuring a straight layout.
Chalk line, tile spacers, T-square.
For accurate cuts, use a wet saw with a 4-in. diamond blade. For detailed cuts around obstacles such as toilet flanges or piping, use nippers or an angle grinder. Always measure carefully—measure twice, cut once. Ensure that you smooth the edges of the cut tiles with a rubbing stone or file for a clean finish.
Wet saw, tile nippers, angle grinder, safety glasses.
Once you’ve confirmed your layout, start laying the tiles using tile spacers to maintain even grout lines. Apply slight pressure on each tile to set them into the thin-set properly. Use a spirit level to ensure the tiles are perfectly flat, adjusting with mortar if necessary.
Tile spacers, spirit level, knee pads.
Mix your thin-set mortar in small batches to maintain the right consistency. Use a notched trowel to apply an even layer of mortar, holding the trowel at a 45-degree angle to create ridges. Press the tiles into the mortar, twisting slightly to ensure good adhesion.
Bucket, drill mixer, notched trowel, thin-set mortar.
After 24 hours, remove the tile spacers and mix the grout. Use a grout float to spread the grout over the tiles, pushing it into the joints. Work diagonally to avoid pulling grout out of the lines. Wipe off excess grout with a damp sponge before it dries.
Grout float, bucket, sponge, sanded grout.
Allow the grout to cure fully before applying a silicone sealant along the edges and around fixtures to prevent moisture seepage.
This is especially important in bathrooms, where constant exposure to water can damage the grout or cause mold growth.
Caulk gun, silicone caulk.
By following this step-by-step guide and using the proper tools and techniques, you’ll be able to tile a bathroom floor with the precision and finish of a master tile setter.
Each step is essential for achieving a beautiful, long-lasting result.
Now that we're done talking about the steps, you might be thinking about the cost. While tiling your bathroom floor yourself can indeed save you a significant amount of money compared to hiring a professional contractor, there are still expenses to consider. The main costs will be materials such as tiles, thin-set mortar, grout, and tools, which can range from $1 to $15 per square foot. However, the DIY approach requires time, effort, and careful planning to ensure a quality outcome. That's why you should first consider whether a DIY method is the best option for your current situation. If not, then you may want to hire a contractor for the job.

Remodeling your bathroom floor is a significant investment, and finding the right contractor is very important to make sure that the job is done efficiently and to your satisfaction. Here’s a step-by-step guide to help you navigate the process of hiring a qualified contractor:
Start by compiling a list of potential contractors through multiple channels:
Once you have a shortlist, check their licenses and certifications to ensure they meet local and state requirements. A reputable contractor should also have valid insurance, including liability and workers' compensation. Additionally, review their portfolio to see examples of previous work, especially with similar bathroom tile projects
Set up interviews with at least three contractors to compare their communication, approach, and professionalism. Ask essential questions such as:
This will give you a sense of how well they understand the scope of your project and whether they can meet your expectations.
Request references from past clients to get insight into the contractor’s reliability, workmanship, and how they handle timelines and budgets. Be sure to read both positive and negative reviews, paying attention to how the contractor resolves any complaints.
Always request detailed written estimates from the contractors. The estimate should break down the costs for labor, materials, and any additional expenses. Make sure to clarify payment terms, deposit amounts, and the schedule for progress payments.
During discussions, make sure the contractor understands your desired timeline and is realistic about how long the project will take.
Also, discuss whether you will provide materials or if the contractor will source them, and ensure all elements of the project are clear from the beginning to avoid misunderstandings.
Before committing, ask the contractor if they offer any warranties or guarantees on their work. This should include coverage for the tile installation and any potential repairs down the line.
By following these steps, you'll be well-prepared to find a reliable contractor for your bathroom remodel. Clear communication and proper vetting will keep your project on schedule and within budget.
Tiling a bathroom floor can elevate the look and functionality of your space, but it requires careful planning and precision. Whether you’re confident in taking on the project yourself or prefer to leave it to professionals, the key is ensuring that every step—from preparation to finishing— is done correctly for long-lasting results. Offering comprehensive bathroom remodel services, we provide professional guidance and execution, ensuring your bathroom upgrade is seamless from start to finish. From design to installation, their experienced team takes care of everything, including permits, material sourcing, and construction.


Calculate the true cost of your bathroom remodel
Get real-time cost estimates for materials and labor, so you can budget your renovation with confidence—no guesswork.
How to
Small House Renovations: Solutions for Limited Space
07.02.2025
Remodeling
Does Homeowners Insurance Cover Renovations?
05.22.2025
Remodeling
What’s the Difference Between a Home Renovation and a Remodel?
05.22.2025

Remodeling
How to Renovate in Brooklyn
05.22.2025
Finance
The Top Renovations That Increase Home Value in 2025
05.22.2025