

Kitchen
Kitchen Plumbing Remodel Tips: 50+ from Planning to Inspection
07.26.2026
04.29.2026

In This Article
A walk-in pantry doesn't need to be sprawling to change the way your kitchen functions. Even a compact walk-in, whether carved out of an underused closet, a corner of the kitchen, or borrowed square footage from an adjacent room, can bring order to your cooking routine and free up valuable cabinet space. The key is getting the pantry size and layout right from the start.
If you're considering adding a small walk-in pantry to your home, you're likely weighing questions like: How much space do I actually need? What are the minimum pantry dimensions that still feel functional? And once I have the space, how do I make every inch count?
| 14-inch shelf rule | Shelves deeper than 14 inches turn into dead space fast. Everyday ingredients disappear behind each other, duplicates pile up, and expired food gets missed until cleanout day. |
| 4x4 cutoff | Below roughly 4 by 4 feet, a walk-in pantry starts fighting the kitchen instead of helping it. Tight clearances force sideways movement and make lower shelves harder to use. |
| “Simple” conversions | Pantry projects priced like quick upgrades often change once demolition starts. Old wiring, plumbing reroutes, and permit reviews can add another 1 to 2 weeks before shelving even goes in. |
Before you start sketching layouts or browsing shelving options, it helps to understand the basic measurements that define a functional walk-in pantry.
Walk-in pantries typically fall into a few size categories:
Regardless of your pantry's total square footage, certain measurements determine whether the space will feel functional or frustrating:
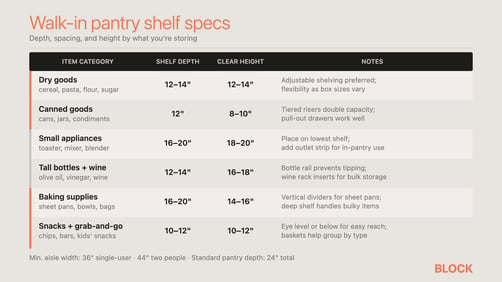
This is where many homeowners make a well-intentioned mistake. The instinct is to go deep, assuming that 16-inch or 18-inch shelves will maximize storage. In reality, deep shelves are a trap. Anything stored in the back becomes invisible, leading to forgotten ingredients, duplicate purchases, and the eventual archaeological dig to find that can of coconut milk you swore you had.
For most pantry items, shallower shelf dimensions are better:
For many homeowners, the biggest question isn't what size pantry they want, but where the square footage will come from. Unless you're building new construction or doing a major addition, you'll need to carve out space from your existing floor plan.
A coat closet, linen closet, or underused storage closet near the kitchen is often the easiest candidate. Closets that meet the 4' x 4' minimum can become a true walk-in pantry. The bones are already there (walls, door, flooring), so the work focuses on adding shelving and possibly lighting.
If your kitchen shares a wall with a dining room, laundry room, or mudroom, you may be able to bump into that space. This involves framing a new wall and adding a doorway, which is more involved than a closet conversion but still manageable for most contractors.
The trade-off is losing square footage from the adjacent room, so think carefully about how that space is being used today. Stealing three feet from a dining room that already feels cramped will create one problem while solving another. On the other hand, if you have an oversized laundry room where half the floor space is empty, borrowing from it is a no-brainer.
Consider traffic patterns too: will the new pantry wall block natural flow between rooms or make furniture placement awkward? Walk through your daily routines and imagine how the change would feel before committing. In some cases, a smaller pantry that preserves the adjacent room's function is the smarter choice.
Compare Proposals with Ease

Many kitchens have awkward areas that aren't earning their keep: the space under a staircase, an oversized broom closet, a deep but narrow gap between the refrigerator and the wall, or a corner that's too tight for standard cabinetry. These zones can often be reimagined as small walk-in pantries if they meet the minimum dimensions.
If your kitchen is adjacent to a garage or mudroom, claiming a few feet of that space can work well for bulk storage and overflow items. You grab what you need for the week and bring it into the kitchen while the rest stays out of sight.
For homeowners who want a larger walk-in pantry and have the budget, a small bump-out addition is an option. This is the most expensive route, involving foundation work, exterior modifications, and permit approvals. But if your kitchen is maxed out and no interior space can be repurposed, an addition may be the only path forward.

Once you've identified where your walk-in pantry will go, it helps to understand what the construction process looks like.
Walk-in pantry costs vary based on scope, materials, and your local labor market:
Building a walk-in pantry typically unfolds in these stages:
For a straightforward closet conversion, expect one to two weeks. A new walk-in pantry with electrical and custom finishes could take three to six weeks.

The layout you choose depends on your walk-in pantry's shape and how much storage you need.
In a narrow walk-in pantry (4 feet wide or less), a single wall of shelving may be your only option. This keeps the walkway clear and works well for galley-style spaces. Maximize vertical storage by running shelves from about 12 inches off the floor up to the ceiling.
This layout is the easiest to build and often the most budget-friendly.
An L-shaped configuration uses two adjacent walls, leaving the entry wall and one side open. This works well in square or nearly square walk-in pantries (around 5' x 5') and gives you significantly more shelf space than a single wall.
The corner where the two shelf runs meet can be tricky, as items there tend to get forgotten. A lazy Susan or pull-out corner unit can solve this.
If your walk-in pantry is at least 5 feet wide and 5 to 6 feet deep, a U-shaped layout surrounds you with storage on three sides. This packs maximum shelving into a compact footprint.
You'll need adequate clearance in the center (at least 36 inches, ideally 42) to move comfortably. If you're tight on width, an L-shape might serve you better.
A galley walk-in pantry features parallel walls of shelving with a walkway down the middle. This works well for longer, narrower spaces (say, 4 feet wide by 8 feet deep) and provides easy visibility since you can scan both sides at a glance.

A well-sized walk-in pantry is only as useful as its organization.
Fixed shelves look clean, but adjustable shelving gives you flexibility as your storage needs change. Most systems use shelf pins or tracks that let you reposition shelves in 1- to 2-inch increments.
Specify adjustable shelving for at least 75% of your walk-in pantry. You can keep a few fixed shelves for visual consistency.
Shelves alone won't do all the work:
A dim walk-in pantry is a disorganized pantry. If your space doesn't have a ceiling fixture, add one. At minimum, install LED strip lights under the front lip of each shelf. Battery-operated puck lights work if you want to test the concept before wiring anything.
Walk-in pantries can get stuffy, especially with onions, garlic, or other aromatics. A louvered door or a small vent near the ceiling helps air circulate and prevents moisture buildup. If your pantry is fully enclosed with a solid door, even a simple gap at the bottom of the door (about half an inch) can make a noticeable difference in airflow.
A few things to discuss before work begins:
A thoughtfully planned small walk-in pantry can make a real difference in how your kitchen functions. By understanding standard pantry size options, choosing pantry dimensions that fit your space, and layering in smart storage, you'll end up with a walk-in pantry that earns its keep.
If you're ready to move forward, Block Renovation can help you connect with vetted local contractors who understand kitchen projects. From refining your scope to comparing proposals, Block's team is here to help you renovate with clarity and confidence.
Remodel with confidence through Block

Connect to vetted local contractors
We only work with top-tier, thoroughly vetted contractors

Get expert guidance
Our project planners offer expert advice, scope review, and ongoing support as needed

Enjoy peace of mind throughout your renovation
Secure payment system puts you in control and protects your remodel


Renovate confidently with Block
Easily compare quotes from top quality contractors, and get peace of mind with warranty & price protections.
Kitchen
Kitchen Plumbing Remodel Tips: 50+ from Planning to Inspection
07.26.2026

Kitchen
High End Kitchen Renovation Cost: 2026 Budget Guide
07.15.2026

Kitchen
Remodeling Your Kitchen After a Fire: What to Know
07.15.2026

Kitchen
Kitchen Renovation Ideas on a Budget
07.08.2026

Kitchen
A Galley Kitchen Remodel in NYC - Adding a Breakfast Bar
07.02.2026