

Before and After
Kitchen Island Remodel: Before and After Inspo
06.26.2026
05.20.2026

In This Article
A closed kitchen puts your back to the room while you cook. The light comes from one window and the conversation is happening somewhere you can't quite see. For most of the last century, that was simply how kitchens were built, with a wall between the kitchen and the rest of the house holding up the ceiling and going unquestioned.
Take that wall down and the kitchen stops being its own room. Light from the windows next door reaches the counter, and the cook can see the people they're talking to. The before and after images below show what that shift looks like across very different homes. They are here as inspiration, a way to picture what your own kitchen could become and to pull out the decisions that make an open plan work.
Each before and after below moves from a closed kitchen to an open one. Look past the after image to the decision that got it there, because that decision is something you can borrow even if your kitchen looks nothing like the one pictured. Seven kitchens follow, and each one carries a single lesson worth keeping.
%20-%20Edited.png?width=700&height=341&name=1970s%20suburban%20ranch%20home%20renovation%20-%20millenial%20pink%20(1)%20-%20Edited.png)
When the wall between the kitchen and the living room comes down, you get one space where there used to be two, and color is what keeps it from looking like two rooms forced together. You do not need to paint everything in one shade. Pick one or two colors and repeat them on both sides of where the wall stood. In this 1970s ranch, that means a soft pink running from the kitchen cabinetry through to the sofa in the living area, so the eye keeps meeting the same color as it crosses the room.
A closed kitchen often has its own flooring, different from the hallway or the dining room next door. As long as a wall separates them, the change in material goes unnoticed. Remove the wall between the kitchen and the dining room and the two floors meet along the old wall line, where the transition can look like a scar running across the room.
%201970s%20Split-Level%20home.png?width=2816&height=1536&name=Biophilic%20Nature-Inspired%20(The%20Staircase%20High-Angle)%201970s%20Split-Level%20home.png)
The visualized split-level kitchen replaces a patchwork of surfaces with one continuous floor that runs through the kitchen, past the island, and into the dining area, which makes the whole space feel larger than its square footage. Demolition is the moment to do it. The contractors are on site, the subfloor is already exposed, and laying one floor in a single pass costs less than matching or transitioning two floors later.
Removing a wall completely is not the only way to open a kitchen. Sometimes a wide cased opening, or simply enlarging an existing doorway, delivers most of the light and the sightline without taking out the full structure.
.png?width=2816&height=1536&name=Moody%20English%20Countryside%20(The%20Wide%20View).png)
The kitchen in this image keeps its walls but gains a broad opening into the dining room. Light reaches both spaces, and you can see from one room into the next, yet the kitchen still feels like a room rather than a corner of a larger one. A wider opening is worth considering when the wall is load-bearing and a full structural beam would be costly, when the budget is tight, or when you want to keep some separation between cooking and living. Opening up a kitchen is not all-or-nothing, and a wide doorway can be the right answer rather than a fallback.
People take a wall down for the light. They also end up with a permanent view. From the sink or the range, you will see whatever sits on the other side, every day, with no door left to close.
.png?width=2816&height=1536&name=Organic%20Modern%20Ranch%20(The%20Back-to-Front%20View).png)
Here the kitchen opens toward a sunlit room with doors to the garden, so the new sightline rewards you every time you glance up from the counter. It can just as easily go the other way. A wall removed toward a cluttered mudroom, a laundry pile, or the back of a television puts all of it on permanent display. Before you commit, stand where the wall is and look hard at what you would be framing.
.png?width=2816&height=1536&name=Parisian%20Chic%20Apartment%20(The%20Elevated%20Corner%20View).png)
Color can also do the reverse job. If you want the kitchen to keep its own identity once the wall is gone, a single concentrated block of color will mark it out without a barrier. In this Parisian apartment, deep charcoal cabinetry sets the kitchen apart from the pale walls and parquet around it: nothing physically encloses it, but the dark units make clear where the kitchen starts and stops.
Wall cabinets need a wall to hang on. Tall pantry units need one too. When you remove a wall, you often lose a stretch of storage that the closed kitchen quietly depended on, and open-plan kitchens can end up feeling short on cupboards if no one accounts for that loss early.
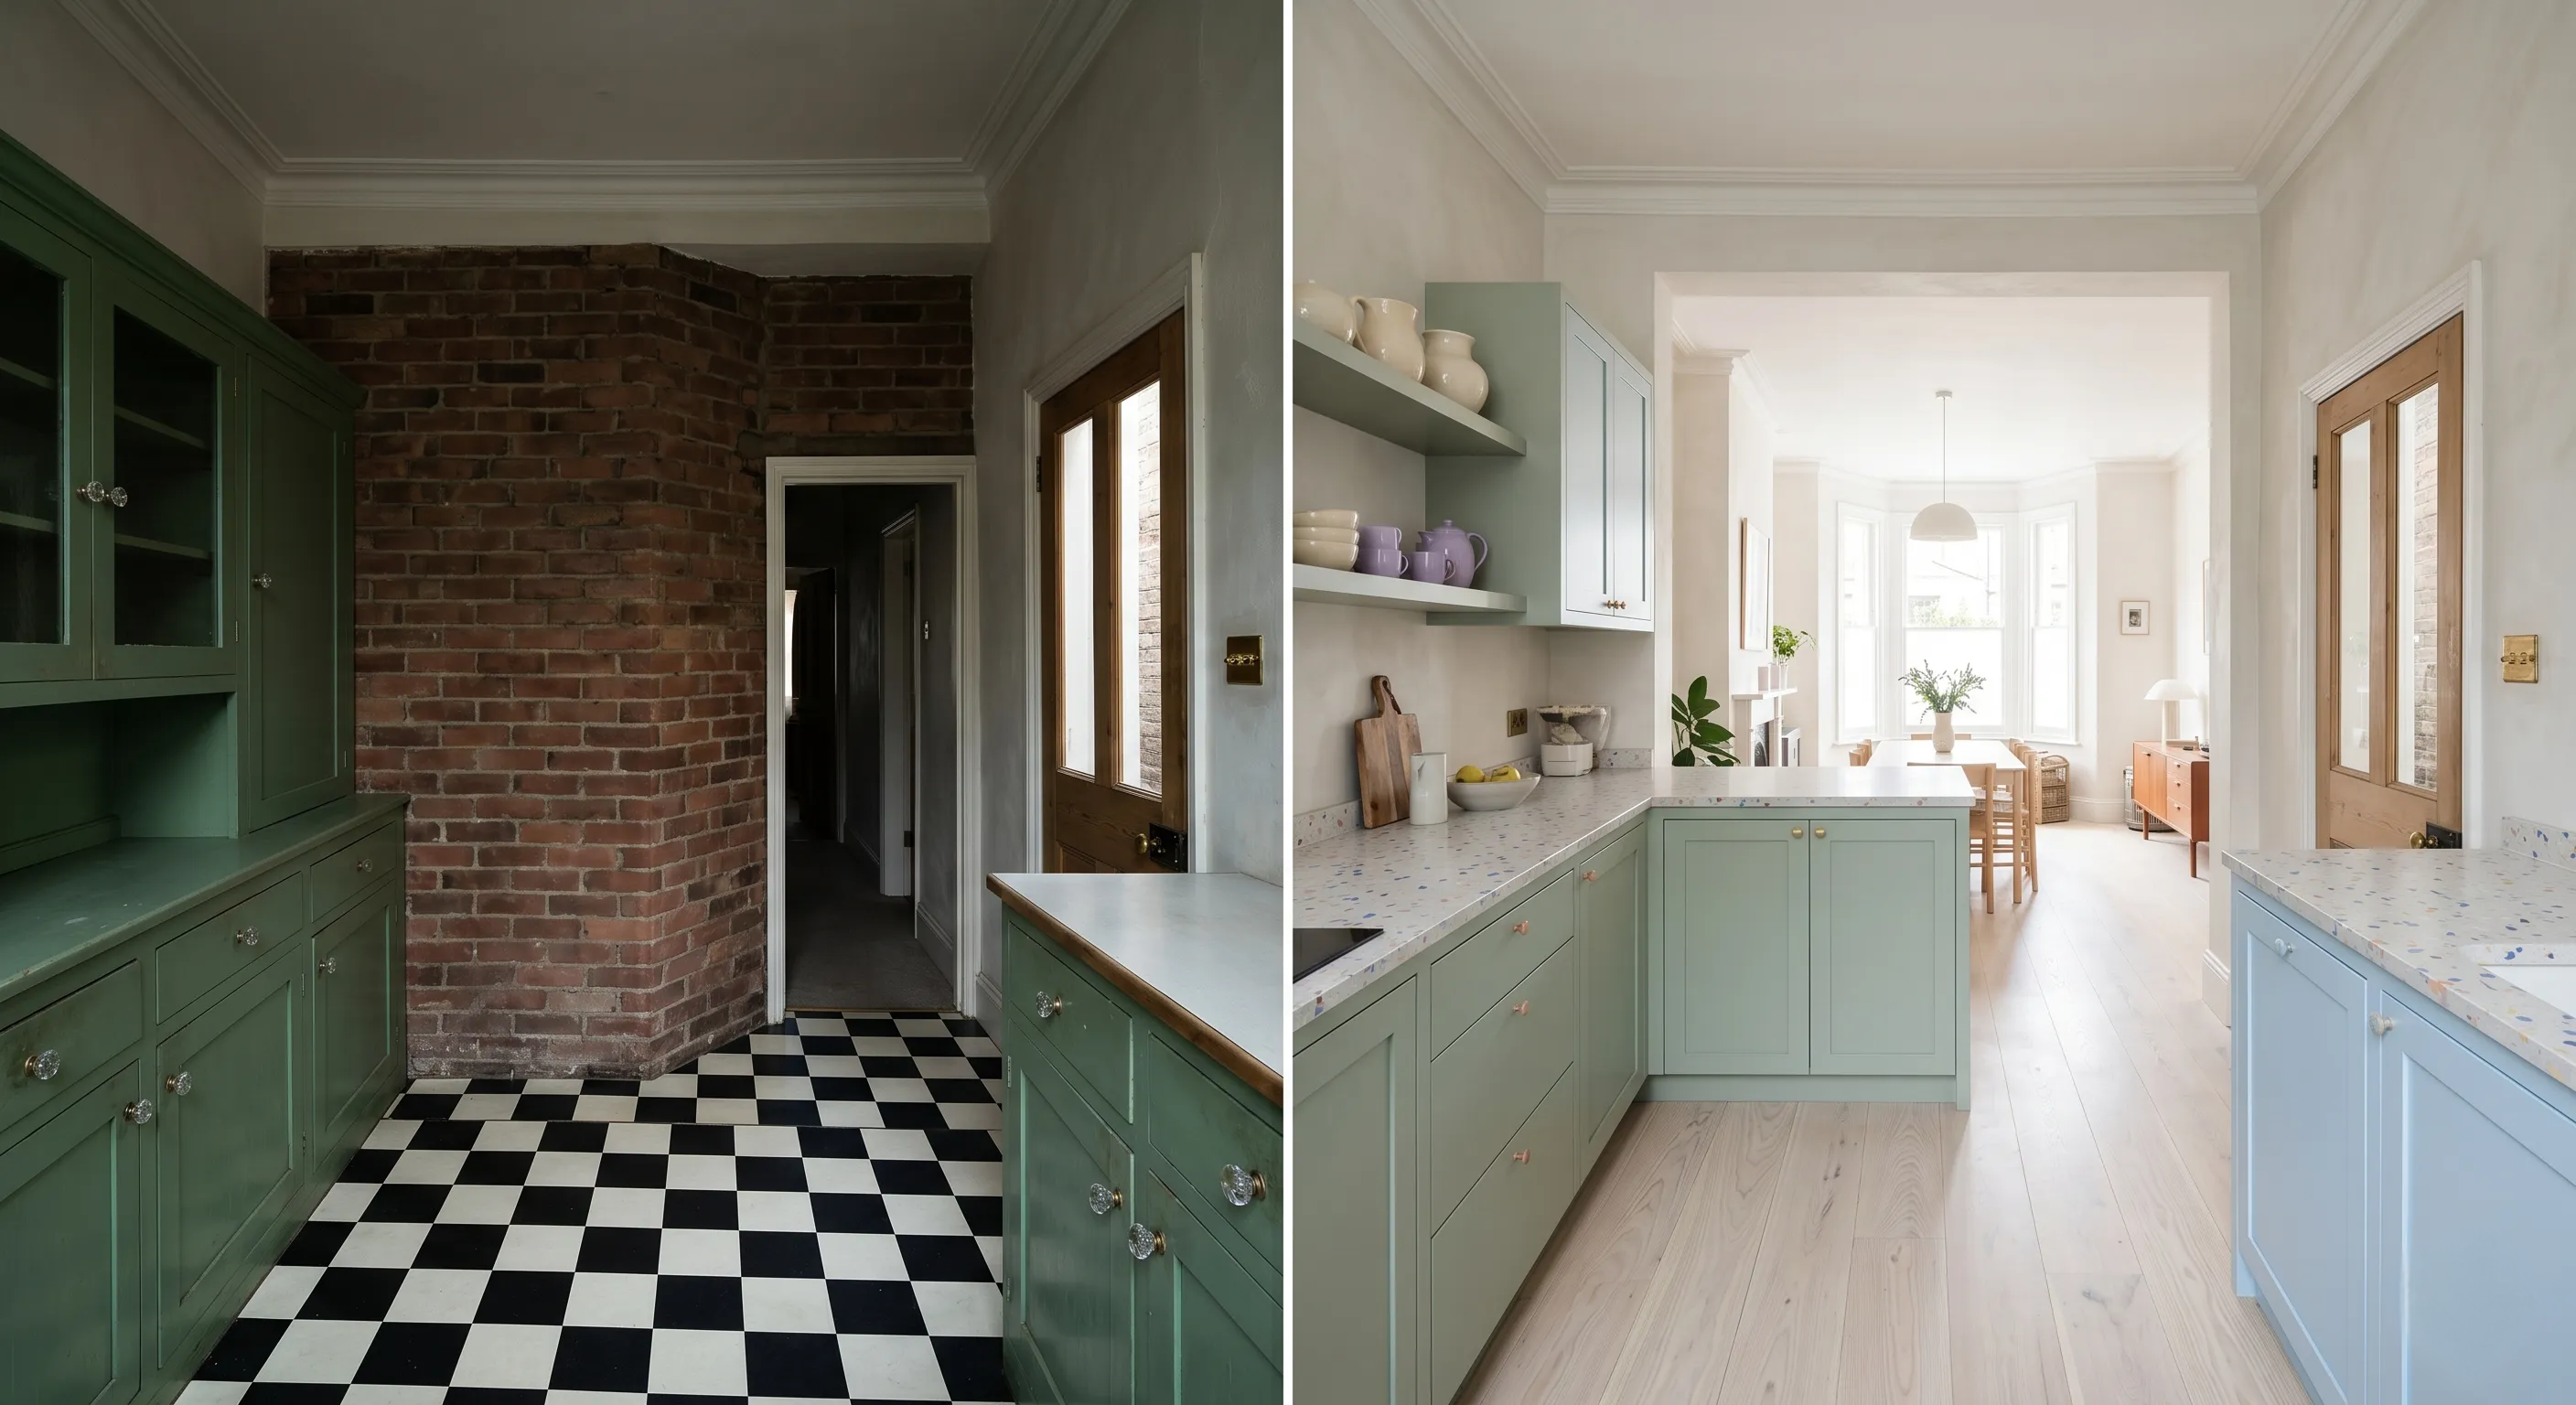
The pictured Victorian kitchen handles the trade-off with care. Open shelving picks up display storage on the walls that remain, a peninsula adds a run of enclosed cabinets, and the layout holds on to a full length of base units. Before any demolition begins, take an inventory of every cabinet and shelf currently living on the wall you plan to remove. Then decide where that storage will go instead: into an island or peninsula, a dedicated pantry wall, taller cabinets on the remaining walls, or open shelving.
An island is the natural replacement for the wall you just removed. It can sit in part of the footprint the wall used to hold, so the opened room does not feel strangely empty, and it returns the counter space and cabinet storage that came out with the old units.
.png?width=2816&height=1536&name=Warm%20Mediterranean%20(The%20Side-Wall%20Perspective).png)
In the visualized Mediterranean kitchen, a wood island stands close to the line where the old partition divided the room. It also does something the closed galley never could: it gives people a place to sit inside the kitchen, facing the cook, instead of waiting it out in the next room.
Treat the island as a decision to make early, not a finishing touch. Its size is governed by the clear space around it, and you want roughly 36 to 42 inches on every side so two people can pass and a dishwasher door can swing open. The moment you decide to put a sink or a cooktop in it, the island also pulls plumbing, drainage, or electrical into the middle of the floor. That is far cheaper to plan before the slab and the wiring are settled than to retrofit afterward.
Before any of the inspiration above becomes a plan, one question decides almost everything: is the wall load-bearing? A load-bearing wall carries weight from the structure above it, and a great many interior kitchen walls do exactly that, especially walls that run perpendicular to the floor joists or sit directly beneath a wall on the floor above.
You cannot tell whether a wall is structural by looking at it, and it is not worth guessing. The first real step is a structural engineer's assessment, which usually costs $300 to $1,000. The engineer confirms whether the wall is load-bearing and, if it is, specifies the beam and the supports needed to carry the load once the wall is gone.
A load-bearing wall can still come out. It is replaced with a beam, typically steel or engineered lumber, supported by a post at each end, and that assembly is what keeps the new opening clear and the ceiling where it should be. Walls tend to hide services as well. Electrical wiring, plumbing, and ductwork often run inside the very wall you want to remove, and all of it needs rerouting. In most areas, taking out a structural wall also requires a building permit, and skipping that step reliably causes trouble when you eventually sell the home.
Compare Proposals with Ease

Costs vary widely, and the load-bearing question is the single biggest factor. The figures below are approximate ranges meant to help you frame a budget. They are not quotes.
One more point matters for anyone treating these before and after images as a target. The wall removal is rarely the whole project. Every open kitchen pictured in this article also has new cabinetry, new counters, and updated lighting, and the open plan is only one line item among many. A realistic budget covers the full kitchen renovation rather than the demolition alone. Whatever your total turns out to be, set aside 10 to 20% of it as a contingency for the surprises that tend to hide inside walls. On a $40,000 kitchen renovation, that is $4,000 to $8,000 held in reserve.
The gap between an inspiring after image and a finished kitchen is mostly planning. A few habits keep that gap small.
That last point is where open-plan projects most often go over budget. The finishing work is exactly the kind of detail that drops out of a scope and comes back later as a change order, which is a revision to the agreed contract and price after the work is underway.
Planning of this kind is what Block Renovation was built to support. Block matches you with vetted local contractors, has every project scope reviewed by experts who catch missing line items and red flags early, and holds payments in a progress-based system so contractors are paid as the work is completed. On a project where one overlooked structural detail can be expensive, that review and that protection are worth having.
Remodel with confidence through Block

Connect to vetted local contractors
We only work with top-tier, thoroughly vetted contractors

Get expert guidance
Our project planners offer expert advice, scope review, and ongoing support as needed

Enjoy peace of mind throughout your renovation
Secure payment system puts you in control and protects your remodel


Renovate confidently with Block
Easily compare quotes from top quality contractors, and get peace of mind with warranty & price protections.
Before and After
Kitchen Island Remodel: Before and After Inspo
06.26.2026

Before and After
Modern Farmhouse Kitchen Renovations Before and After
06.16.2026

Before and After
Limewash Brick Before and After: Photos and What to Know
06.10.2026

Before and After
Budget Small Kitchen Remodel: Before and After Ideas
06.08.2026

Before and After
Mid-Century Modern Exterior Before and After Ideas
06.04.2026