

Home Addition
Bump Out Addition Cost, Ideas & Planning Guide
07.08.2026
07.08.2026
In This Article
If one cramped room is the reason your whole house feels too small, you probably don't need a full addition. A bump out addition extends that single room by 2 to 15 feet, adding the exact space a kitchen island, double vanity, or walk-in closet requires without the foundation, roofline, and monthslong timeline of building a new room. Most bump outs cost $5,000 to $50,000, with complex kitchen, bathroom, and family room projects reaching $80,000 or more, and even the high end sits well below what a conventional addition runs.
|
Planning question |
Short answer |
|
Typical size |
2 to 15 feet deep, usually 20 to 150 square feet |
|
Typical cost |
$5,000 to $50,000; complex projects reach $80,000+ |
|
Foundation needed? |
Often not for bump outs under about 4 feet; usually yes beyond that |
|
Cheapest versions |
Window seat, bay window, storage alcove |
|
Most expensive versions |
Kitchens, bathrooms, anything moving plumbing or gas |
|
Timeline |
4 to 12 weeks for most projects |

"With any addition, it's important that it remains proportionate to the existing home in both height and length. It should also match the architectural style so the addition feels integrated with the original structure rather than like an afterthought."
A bump out addition is a modest extension of an existing room, designed to add just enough square footage to solve a specific problem. A kitchen bump out might add 4 feet to one wall, making room for a breakfast nook or extra cabinets. A bathroom bump out could allow for a double vanity or a walk-in shower. Some homeowners use a bump out to create a window seat in the living room, expand a primary bedroom with a walk-in closet, or carve out space for a mudroom at the back entry.
Unlike a full addition, a bump out does not create a new, separate room or dramatically alter the home's footprint. It's a targeted expansion of a room you already have, and because it borrows the existing room's heating, cooling, and often its plumbing, the construction stays smaller and simpler than a room built from scratch.
Contractor Maksim Sauchanka, owner of BMR Belmax Remodeling, stressed to us that bigger isn't always better when it comes to additions. In his words: "A request I push back on pretty often is adding square footage without thinking carefully enough about proportion and flow. Some homeowners are very focused on 'more space,' but not every addition makes the house better."

"I'd rather see a well-shaped addition that feels integrated than extra square footage that makes the layout awkward or the exterior look like an afterthought."
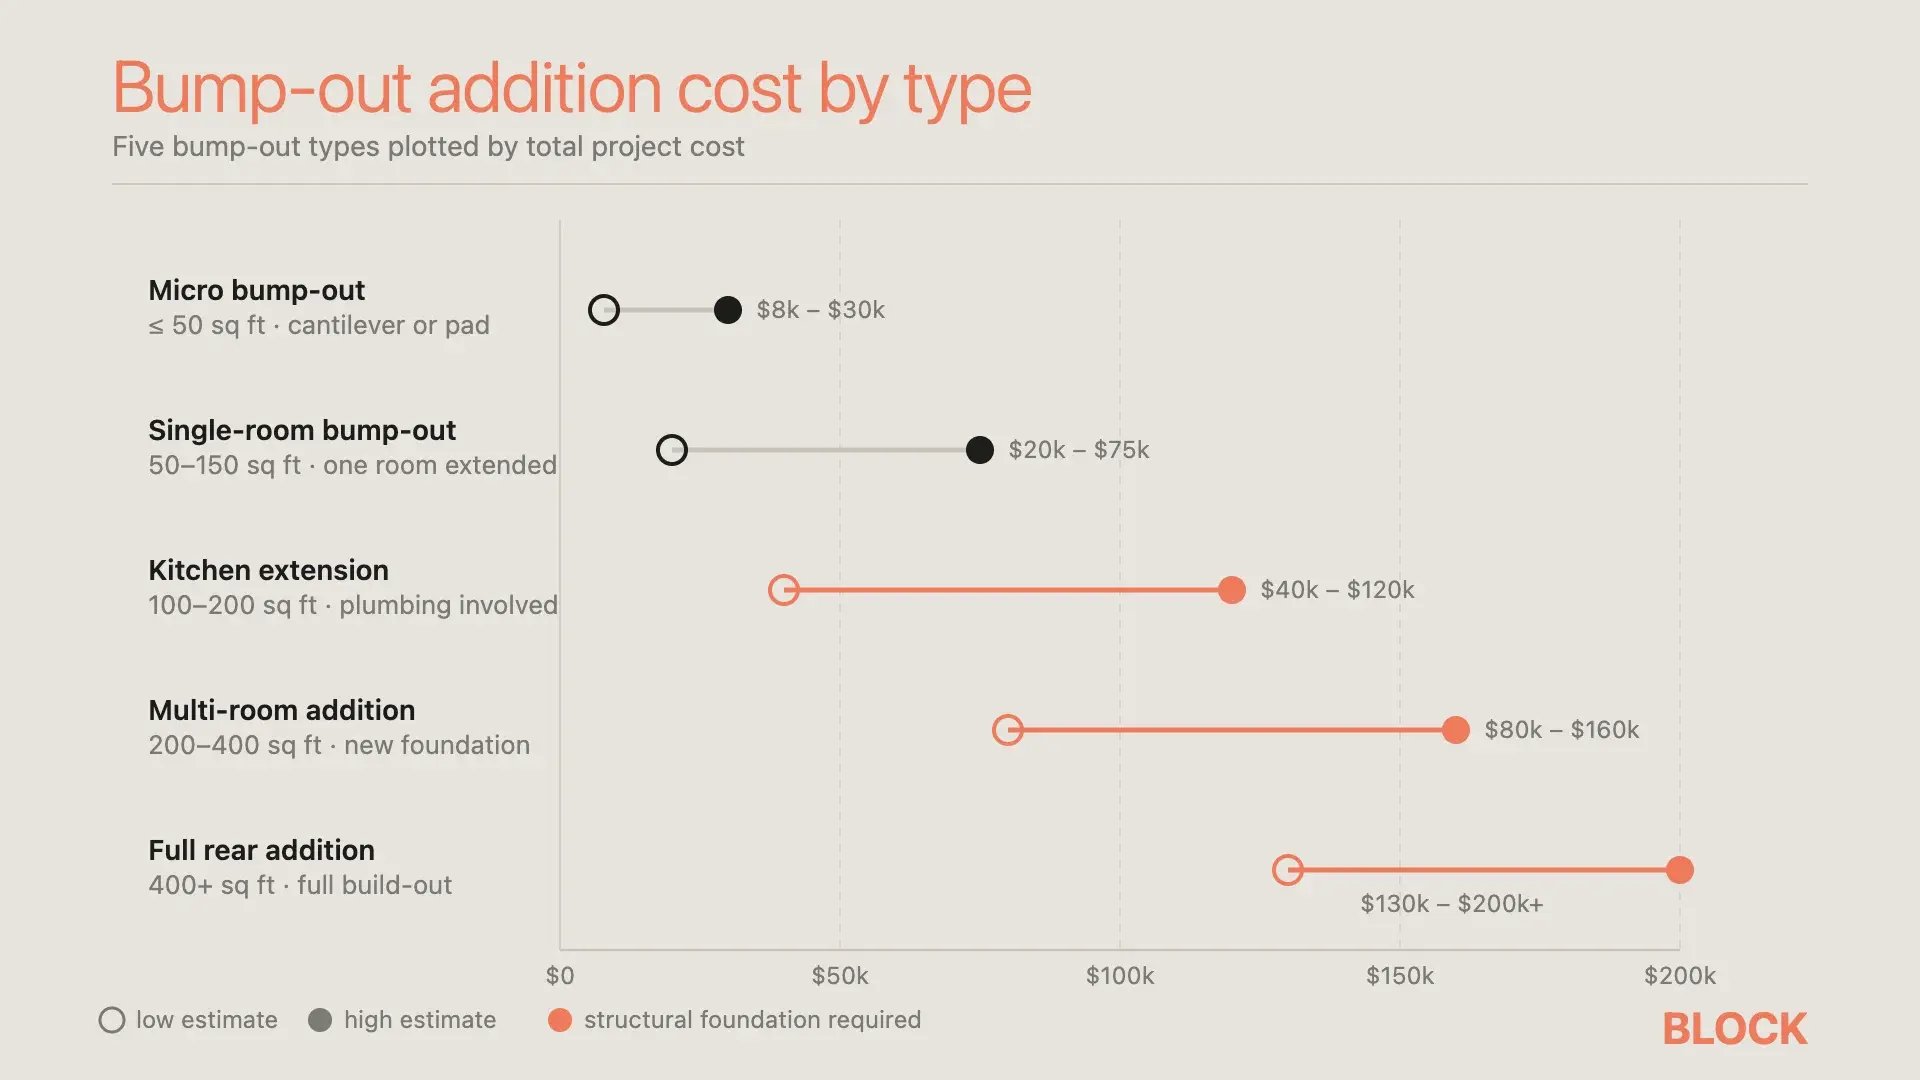
Most bump out additions cost $90 to $300 per square foot, with typical projects landing between $5,000 and $50,000 in total. Small projects, such as a bay window or a window seat alcove, can start around $2,000 to $6,000. Kitchen and bathroom expansions usually run $15,000 to $50,000 because of the trade work involved. Highly customized bump outs with significant plumbing or structural work can reach $80,000 or more.
|
Bump out type |
Typical size |
Typical cost |
|
Bay window or window seat |
10 to 25 sq ft |
$2,000 to $15,000 |
|
Bathroom expansion |
15 to 40 sq ft |
$8,000 to $25,000 |
|
Kitchen expansion |
40 to 100 sq ft |
$20,000 to $50,000 |
|
Primary bedroom expansion |
60 to 120 sq ft |
$25,000 to $60,000 |
|
Living or family room |
80 to 150 sq ft |
$30,000 to $80,000+ |
The per-square-foot number is worth a second look, because it's often higher than a full addition's. You're building a complete structural envelope (framing, insulation, siding, roofing, windows) for a small footprint, and fixed costs like permits, engineering review, and exterior finishing don't shrink proportionally just because the addition is small. A bump out costs less in total than a full addition. Per square foot, it usually costs more.
Where your project lands inside that $90 to $300 range comes down to four factors:
The roof tie-in deserves special attention in your contract, according to Daniel Cabrera, owner of Roof Direct San Antonio, who has spent 16 years in residential and commercial roof replacement and construction:

"Change orders arising from additions typically occur during roof connection. Deteriorating decking, undersized framing members, and faulty flashing become apparent after the shingles are stripped. Arrange an initial roof inspection, document all deficiencies, and then build them into the contract."
The quickest way to estimate a wall bump out is depth times wall length times the per-square-foot rate. Pushing a 12-foot kitchen wall out by 3 feet adds 36 square feet. At $90 to $300 per square foot, that's roughly $3,200 to $10,800 for a simple cantilevered shell, before kitchen-specific upgrades such as cabinetry, countertop runs, appliance moves, or plumbing changes. A 2-foot bump out along the same wall, the kind used for a window seat or extra counter depth, would run about $2,200 to $7,200 on the same basis.
Bump outs range from 2 feet deep to about 15 feet, and the structural method sets the limit. The dividing line is whether the bump out can be cantilevered (extended off your existing floor framing with no foundation underneath) or needs its own footings.
Soil conditions, roof overhangs, and local code all affect these thresholds, so treat the numbers above as planning guidance and get a structural review before you commit to a depth.
A full addition creates a new room (or several) on its own foundation, with its own roof section and often its own HVAC zone. A bump out enlarges a room you already have. That difference drives everything else: cost, timeline, and how much space you end up with.
The practical crossover often starts around 150 to 200 square feet, though foundation work, roof complexity, and finish levels can move that line in either direction. Below it, a bump out's lower total cost wins even though its per-square-foot rate is higher. Above it, a full addition delivers more space for the money, since its fixed costs spread across more square footage. A few quick tests point you toward the right side of that line:
Pros:
Cons:
The math behind bump outs explains why small ones punch above their size. A 3-foot-deep bump out spanning a 15-foot wall adds 45 square feet, about 3% of a 1,500-square-foot home. Inside a 150-square-foot kitchen, that same 45 square feet is a 30% increase, enough to change the layout rather than just the total. Depth is the best starting point for matching a bump out to a purpose:
|
Depth |
Usually good for |
|
2 feet |
Window seat, counter depth, built-ins, shallow storage |
|
3 to 4 feet |
Breakfast nook, vanity expansion, mudroom bench, media alcove |
|
5 to 8 feet |
Kitchen seating zone, larger bath layout, walk-in closet |
|
8 to 15 feet |
Room-scale extension, family room expansion, suite upgrade |
A kitchen bump out can open up a cramped galley enough to fit an island, a breakfast nook, or a better cooking-and-entertaining layout. Moving plumbing, gas, or electrical lines is the usual budget driver. The further your sink, dishwasher, or range needs to migrate, the more trade work piles up.
The catch most homeowners don't anticipate: cabinets older than about 5 years often can't be color-matched exactly, even from the same manufacturer. If your existing cabinetry has aged, you have three options: accept a visible seam at the junction, paint or stain the whole kitchen one color, or budget for refacing alongside the bump out.
A bump out bathroom addition can turn a one-person bathroom into a comfortable two-vanity space or fit a real shower where there was only a stall. The biggest hidden cost driver is toilet placement: moving a toilet more than about 3 feet from the existing waste stack means cutting slab or notching joists for new drain lines. Bathroom bump outs that expand the shower and vanity but keep the toilet in place run dramatically cheaper than ones that rework the entire layout.
A bump out is also the easiest place in your house to install a curbless, zero-entry shower, because the subfloor is being framed from scratch and can be dropped to the right depth. Retrofitting a curbless shower into an existing bathroom is invasive and expensive; building one into a fresh bump out costs almost nothing extra. That's a quiet win for accessibility and aging-in-place planning, which is shaping how Americans are renovating in 2026: more than 1 in 5 U.S. households now identify as multigenerational.
A bump out bedroom addition can finally give you room for a walk-in closet, a sitting area, or a private bath.
Ashley Doyle and her husband have zero regrets about bumping out their bedroom. "Our king-size bed took up most of the floor space and the closet was a single rod and a shelf split between two people. We bumped out about 90 square feet off the back wall, which gave us a real walk-in closet and more room to maneuver. Now, we can have things like a TV stand and dog bed in our room."
Two practical decisions tend to get overlooked at the planning stage:
Extending a living or family room with a bump out can create a more open, flexible space for gatherings.
The most common floor-plan mistake here is glass placement relative to the TV. A wall of windows behind the TV creates daytime glare on the screen; a wall of windows across from it creates evening reflections you'll see every time you watch anything dark. The fix is to put new glazing on the wall perpendicular to where the TV will live. You keep the light without losing the room to glare.
Getting the roofline right matters most on this room. Living rooms usually sit near the entrance and face the street, so any misalignment between the bump out's roof and the original will be visible every time you pull into the driveway.
A bump out is a clean way to carve out a dedicated office or study, especially as remote work has become a permanent fixture in more households. Prioritize built-in shelving, ample outlets, and layered lighting (overhead plus task) to keep eye strain manageable during long sessions.
Soundproofing and privacy matter more than people expect. Position the office away from high-traffic areas like kitchens, kid zones, and laundry. For regular video calls, consider double drywall, resilient channel, or a solid-core door. While the wall is open, install an egress-compliant window from day one. A study doesn't legally need one, but a bedroom does, and bump out spaces marketed as flex-office regularly get reclassified as bedrooms by future owners or appraisers. Adding a code-compliant window during construction costs almost nothing; skipping it means the space can never be counted as a bedroom at resale.
A bump out turns a cramped entryway into a real mudroom, with room for built-in storage and seating.
One detail worth thinking through carefully: bench height. Standard is 17 to 18 inches, which works for adults but is wrong for households with young kids who can't climb up to use it, and uncomfortable for very tall people who end up with their knees in their face. Spend five minutes measuring the heights of the people who'll actually use it before signing off on the design. It's the cheapest comfort upgrade in the whole project, and the most commonly skipped.
Find inspiration and practicalities in our guide to custom mudroom additions.
A dining bump out can free the kitchen from a too-big table or create a dedicated breakfast nook tucked into a bay window. Whichever direction you go, get the electrical right before framing closes up. The single most common regret on dining bump outs: the pendant or chandelier box is centered on the geometric middle of the new space, but the table ends up offset because of door swings, sightlines, or how the chairs actually fit. Place the table in the floor plan first, then center the light box over the table rather than the room, since relocating a ceiling box after drywall means patching, repainting, and rewiring.
For Atlanta homeowner Keisha Knowles, a 6-foot bump out doubled as a window upgrade. "We extended about six feet off the back of the house and used it as an excuse to put in larger, newer windows. Because we face East-ish, the whole space fills with light in the morning."
The roof junction is where cut corners show up later, and Cabrera sees one shortcut more than any other:
"Improper flashing installation is the biggest concern that I encounter during roof repairs and replacements in addition roofs. I recently repaired a roof addition in Stone Oak where the previous contractor had installed flashing with only caulk for a seal, which ended up staining the original ceiling. It took us three days to replace the flashings and reconstruct the valley."
A bump out is a small project with real structural stakes: floor framing gets extended, an exterior wall gets opened, and a new roof section has to tie into the old one. Block Renovation connects you with vetted local contractors who have handled structural openings, roof tie-ins, exterior matching, and addition permitting in your area, so the crew quoting your project already knows what the junction work involves.
Every scope is reviewed by Block experts before you commit, which catches missing line items (roof inspection, flashing details, siding transitions) while they're still cheap to add. Because bump out change orders concentrate at the roof connection and inside opened walls, that upfront review is where a small addition's budget is won or lost.
Payments run through Block's secure system and are released as the project progresses, so the contractor stays incentivized to keep the framing, roofing, and finish stages on schedule. Get competitive quotes from contractors who have built additions like yours, and compare the scopes line by line before anyone breaks ground.
Remodel with confidence through Block

Connect to vetted local contractors
We only work with top-tier, thoroughly vetted contractors

Get expert guidance
Our project planners offer expert advice, scope review, and ongoing support as needed

Enjoy peace of mind throughout your renovation
Secure payment system puts you in control and protects your remodel


Renovate confidently with Block
Easily compare quotes from top quality contractors, and get peace of mind with warranty & price protections.
Home Addition
Bump Out Addition Cost, Ideas & Planning Guide
07.08.2026

Home Addition
How to Plan a Home Addition: Process and Timeline
07.01.2026

Home Addition
Family Room Addition Ideas - Know Your Options
05.28.2026

Home Addition
How to Calculate the Cost of a Room Addition
05.23.2026

Home Addition
Cantilevered Bump Out Addition: When It Makes Sense
05.15.2026