



Bathroom
York City Bathroom Remodel: Costs, Planning & Design
09.17.2026
08.03.2026


In This Article
Texturing a bathroom wall does more for the room than a new paint color and costs less than tiling the same square footage. Limewash, plaster, reeded tile, and knockdown all add depth and shadow to a flat surface, and most of them go on the walls tile usually skips: the entry wall, the wall behind the vanity, the space above a wainscot. All of that depends on where the water goes. A finish that holds up for 15 years outside the splash zone can fail in 18 months three feet away, so placement matters as much as the material you choose.
The bathroom wall texture ideas below are grouped by material, with the placement each one suits. If you are still deciding whether to add texture at all, Block Renovation's guide to textured vs. smooth walls covers the broader comparison.
| Finish | Best placement | Main caution |
|---|---|---|
| Knockdown, orange peel | Walls outside the splash zone | Traps soap scum near the shower |
| Limewash | Above a tile or stone wainscot | Marks easily at hand height |
| Venetian plaster, Roman clay | Vanity and accent walls | Patching usually means redoing the wall |
| Tadelakt, microcement | Shower interiors, properly installed | Few qualified installers, premium labor |
| Textured and relief tile | Anywhere, including wet zones | Needs raking light to show the profile |
| Split-face stone | Dry accent walls only | Deep recesses hold water and soap film |
| Beadboard, applied molding | Half baths and powder rooms | Needs sealed edges and caulked seams |
Tile works everywhere in a bathroom, including directly under a showerhead. The texture comes from the glaze, the tile's shape, or the surface relief, and none of those depend on the wall staying dry. For layout and pattern options beyond the textured finishes here, see Block's bathroom wall tile ideas.
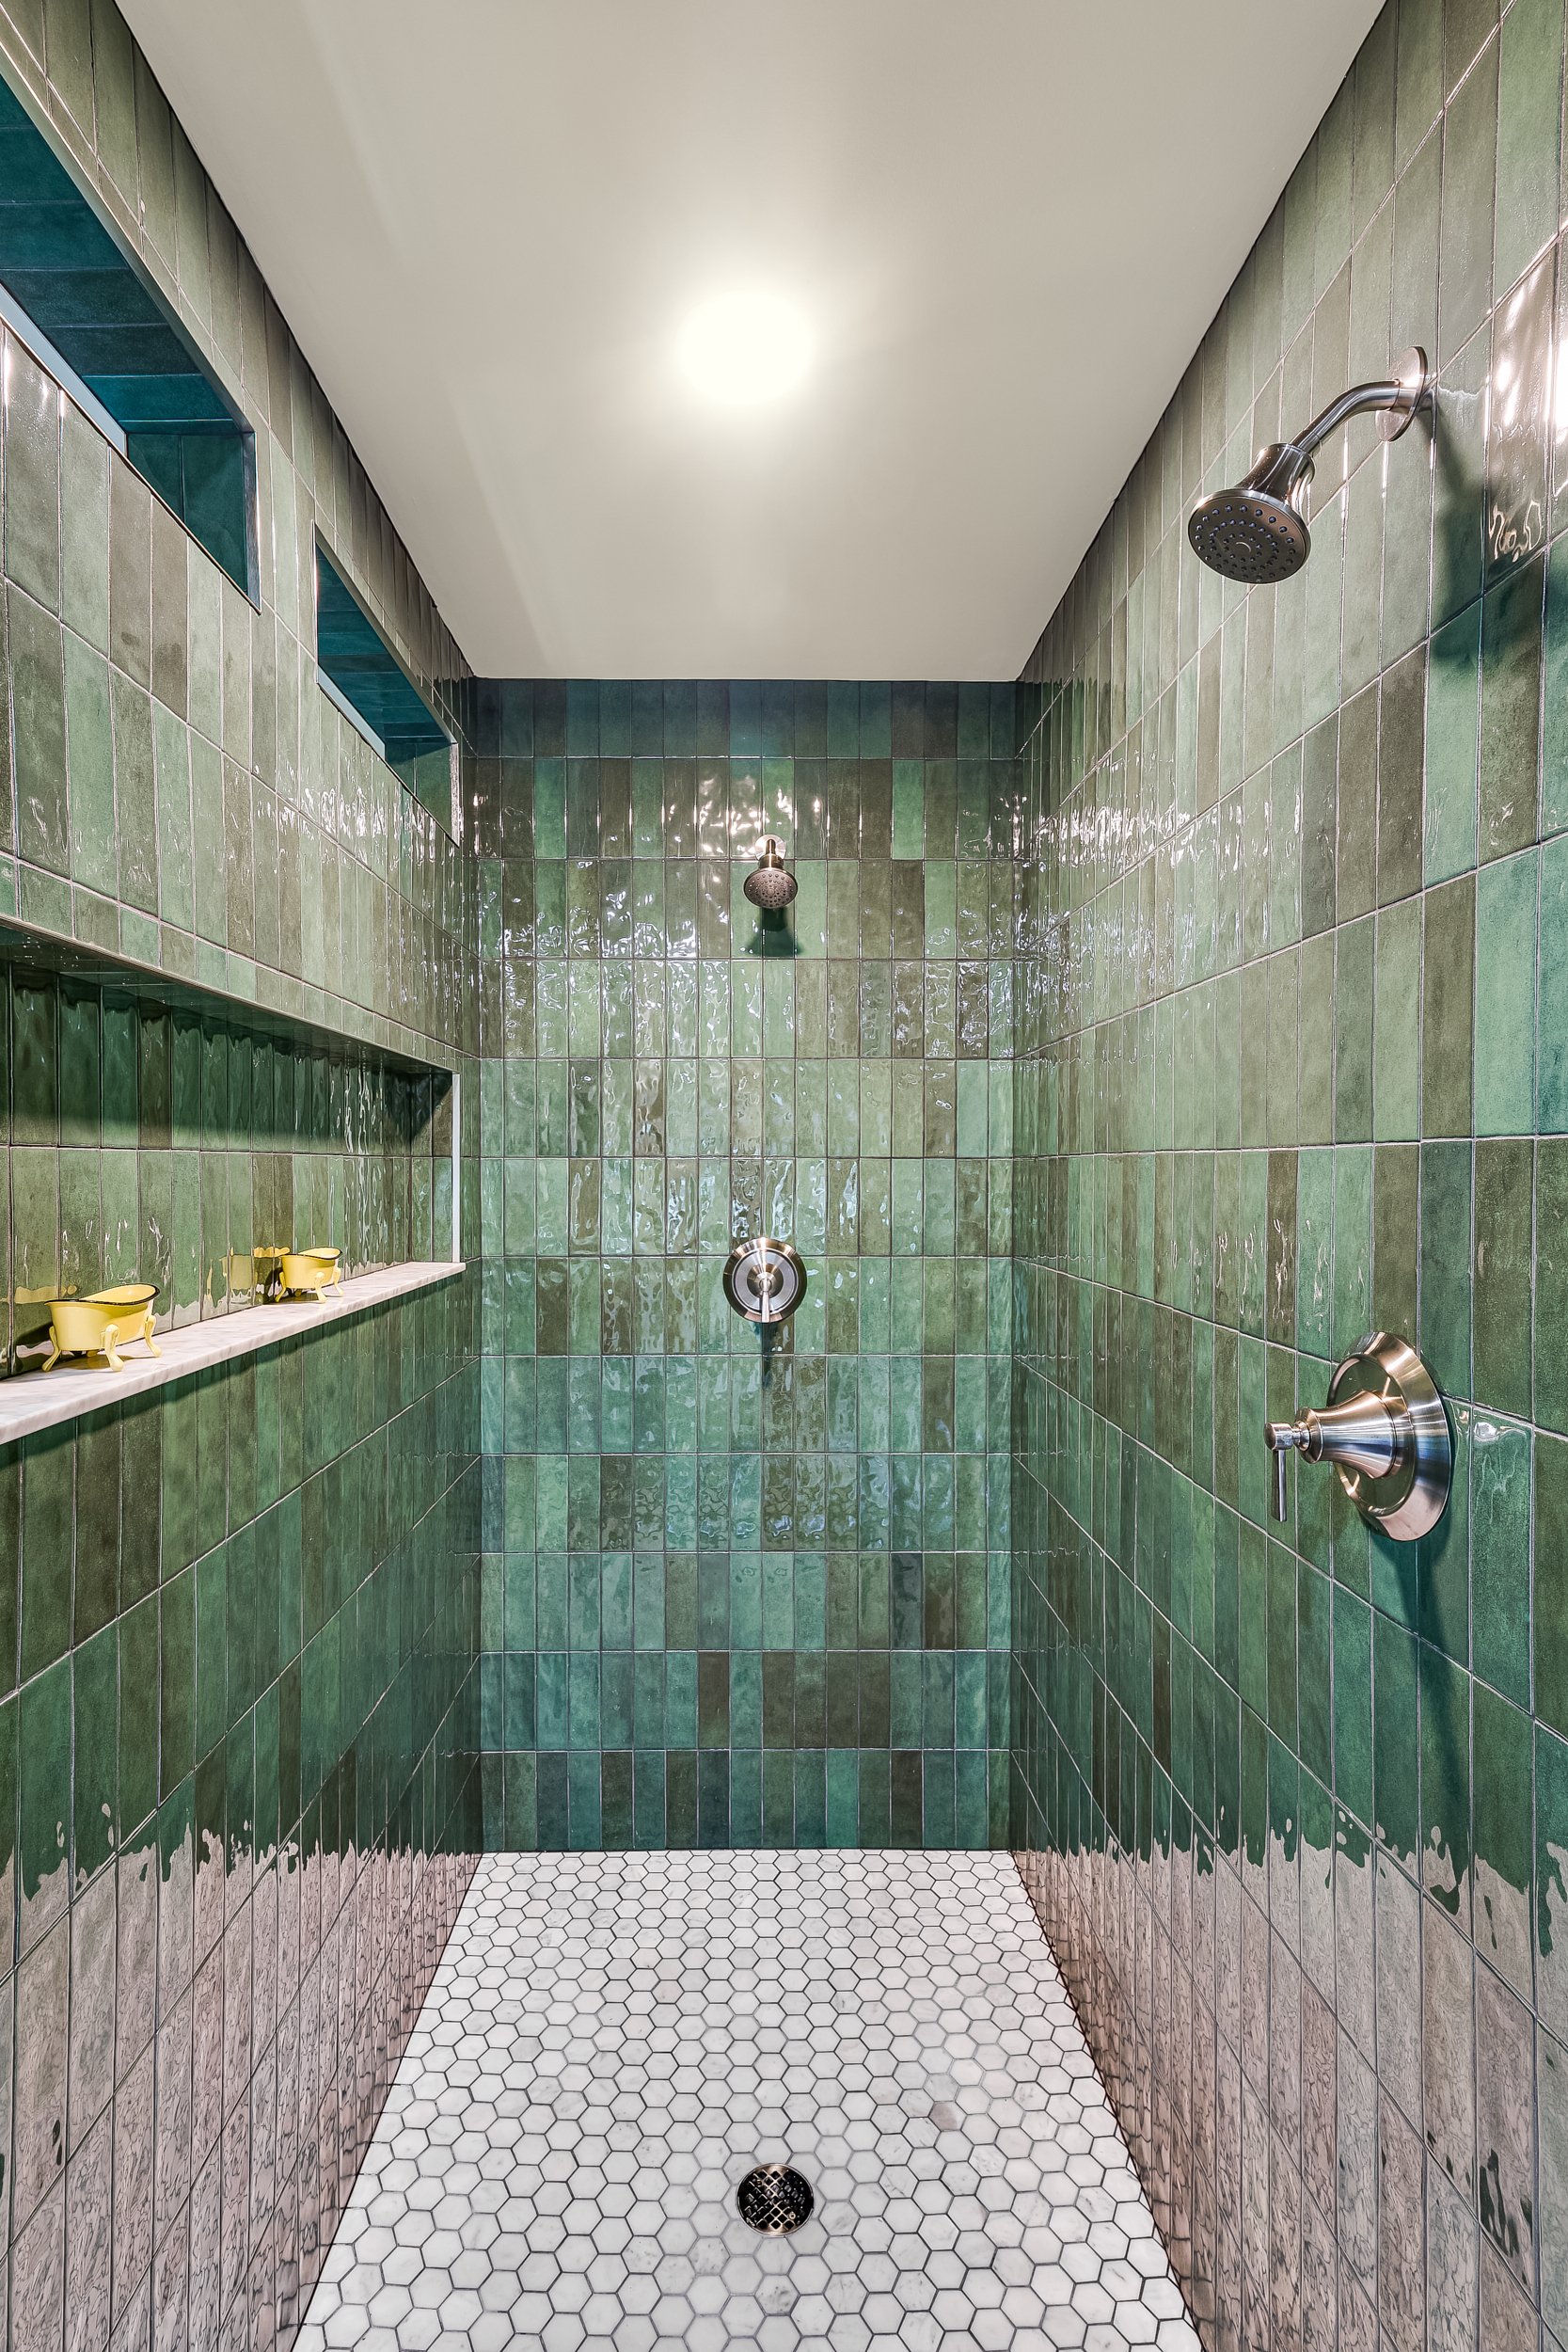
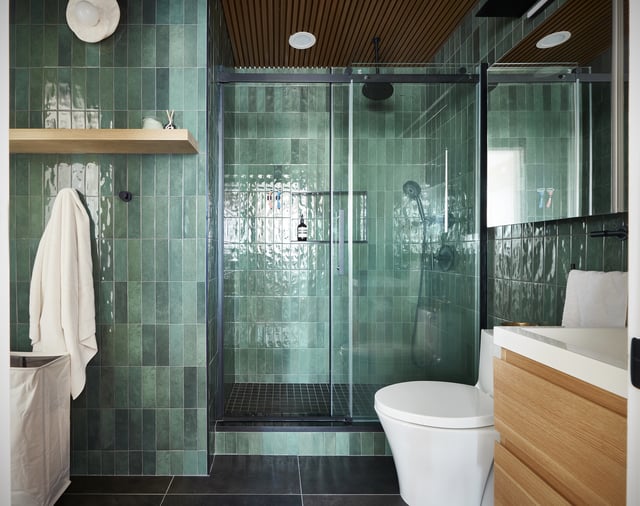
Handmade and zellige-style tiles carry their texture in the glaze rather than the profile, so they survive a wet zone that would destroy a plaster finish. The rippled faces on this emerald stack catch light differently tile to tile, and a single color ends up with the variation of several. Stacking them vertically pulls the eye up and makes a narrow shower feel taller. The marble niche shelf interrupts the field without introducing a competing pattern.
Plan on $15 to $50 per square foot for material, plus a higher labor number than machine-made tile because the irregular edges slow the setter down. See the full emerald shower project.
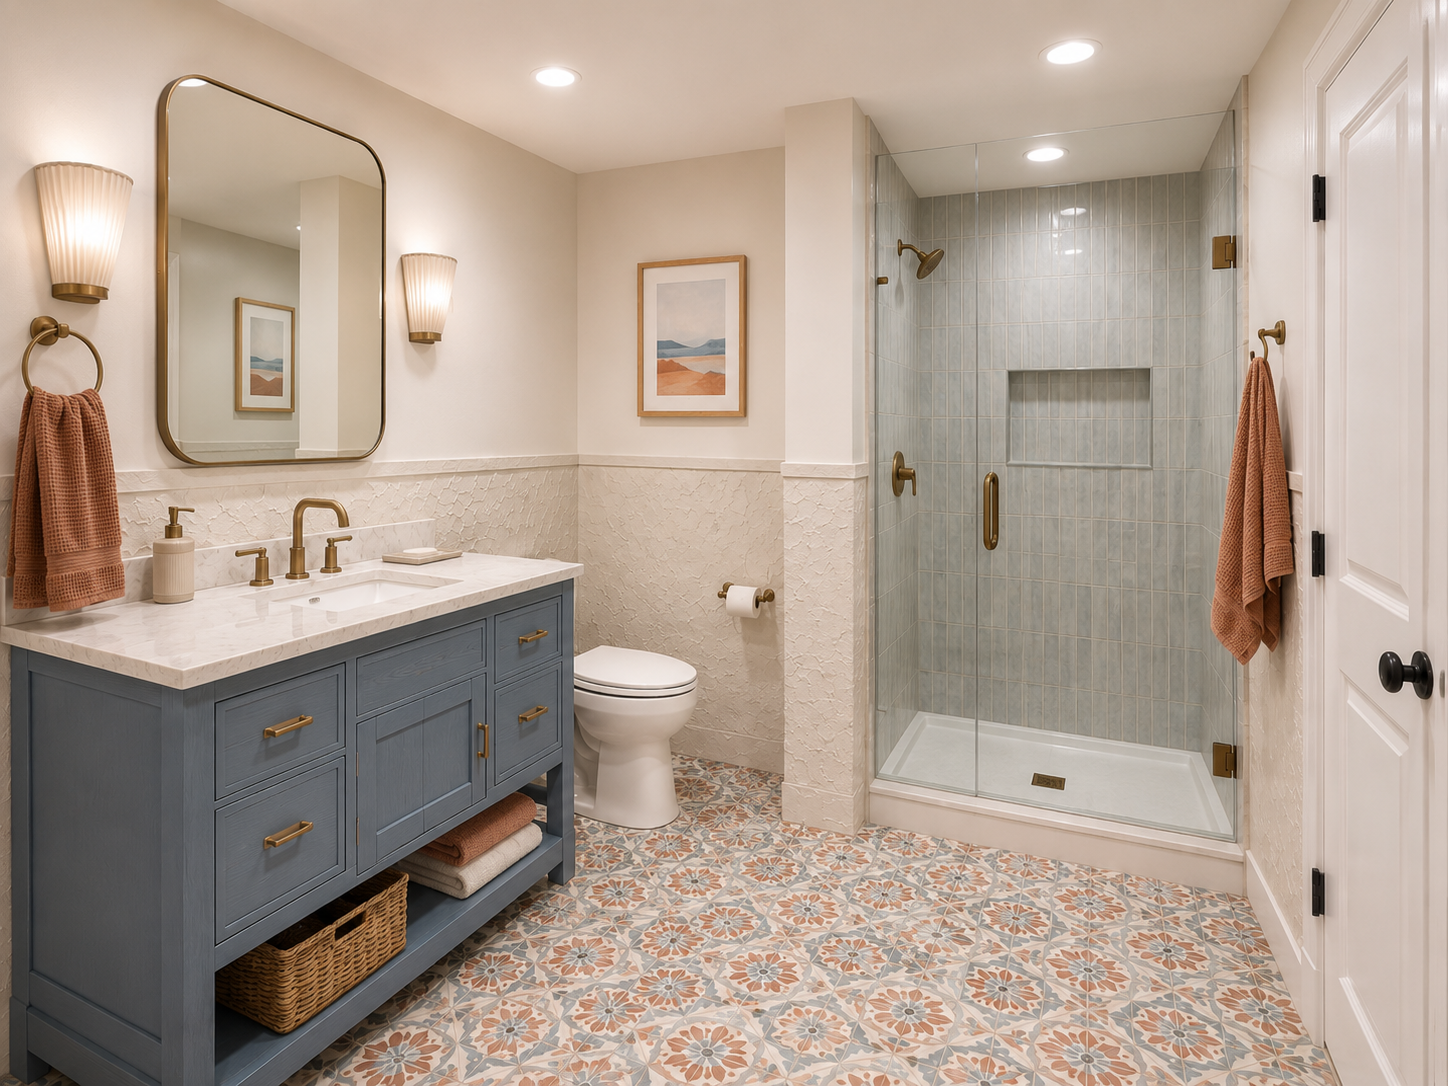
This bathroom runs two textures at two heights. Crackle-glaze tile wraps the room at wainscot height and absorbs the splashes from the sink and toilet, while painted drywall handles everything above it. The shower gets its own vertical stacked tile in a cooler tone, so the two wet areas stay visually separate in a room where the floor is already competing for attention.
Tiling only to wainscot height covers roughly a third of the wall area, making it the cheapest way to get the look in a full bathroom.
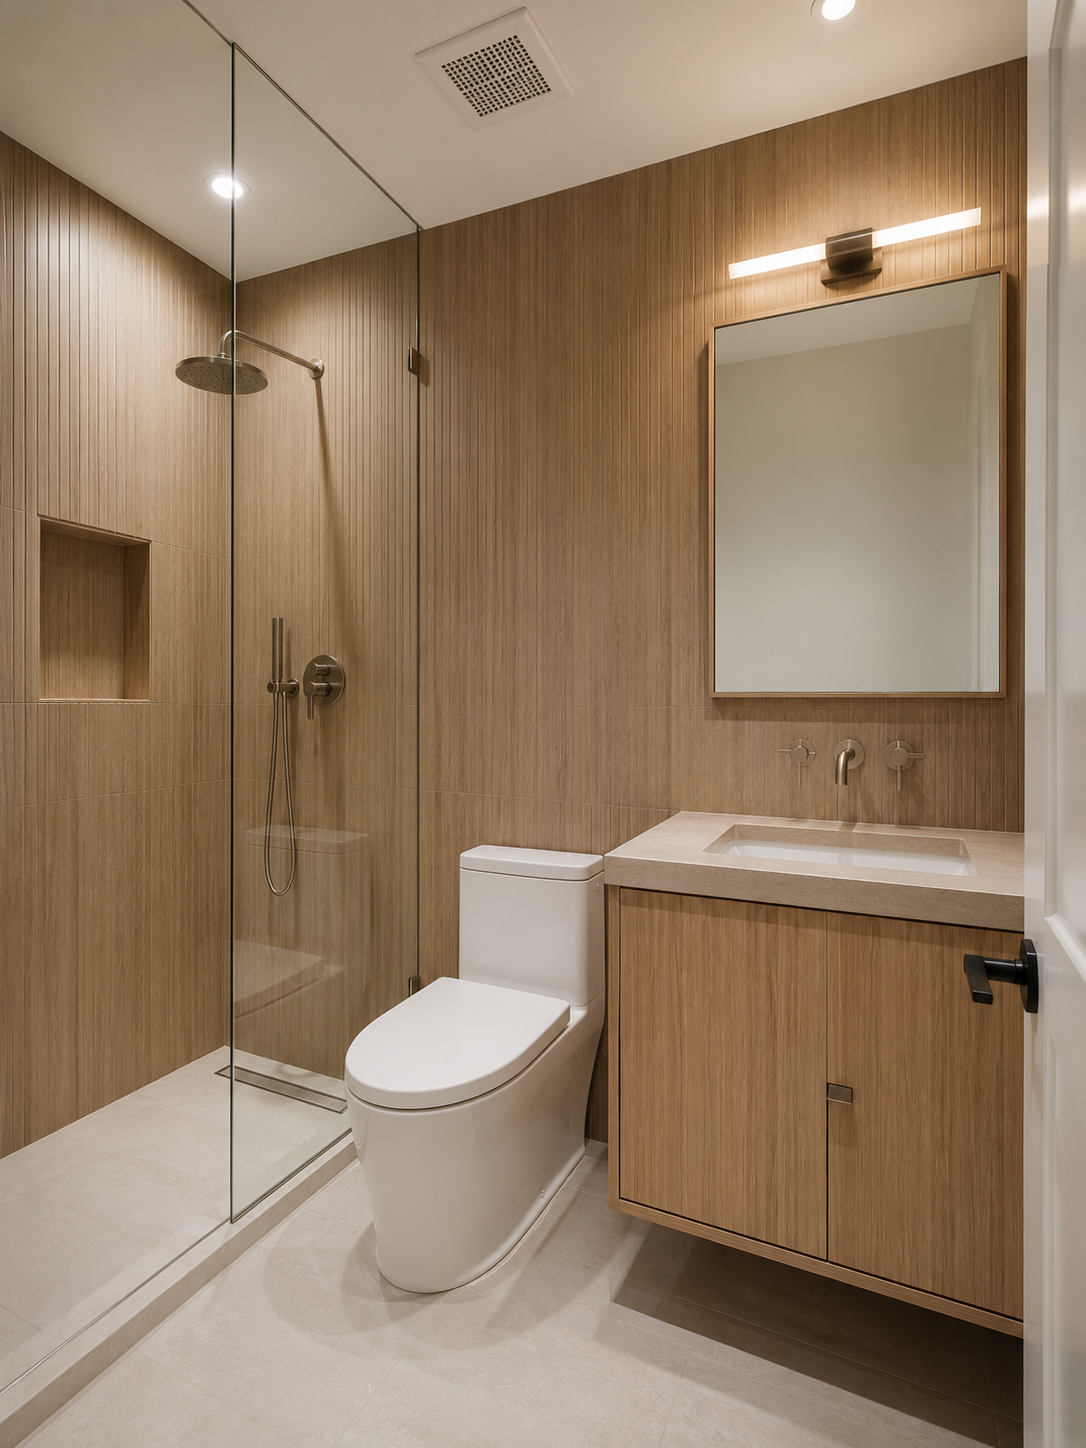
Fine vertical reeding gives a wall a profile you can feel, and the shadow lines shift as light moves through the day. Carried floor to ceiling on every wall, shower included, it turns a small windowless bathroom into one continuous surface instead of a collection of patches. The grooves are uniform and shallow, so a brush runs the length of each channel in one pass.
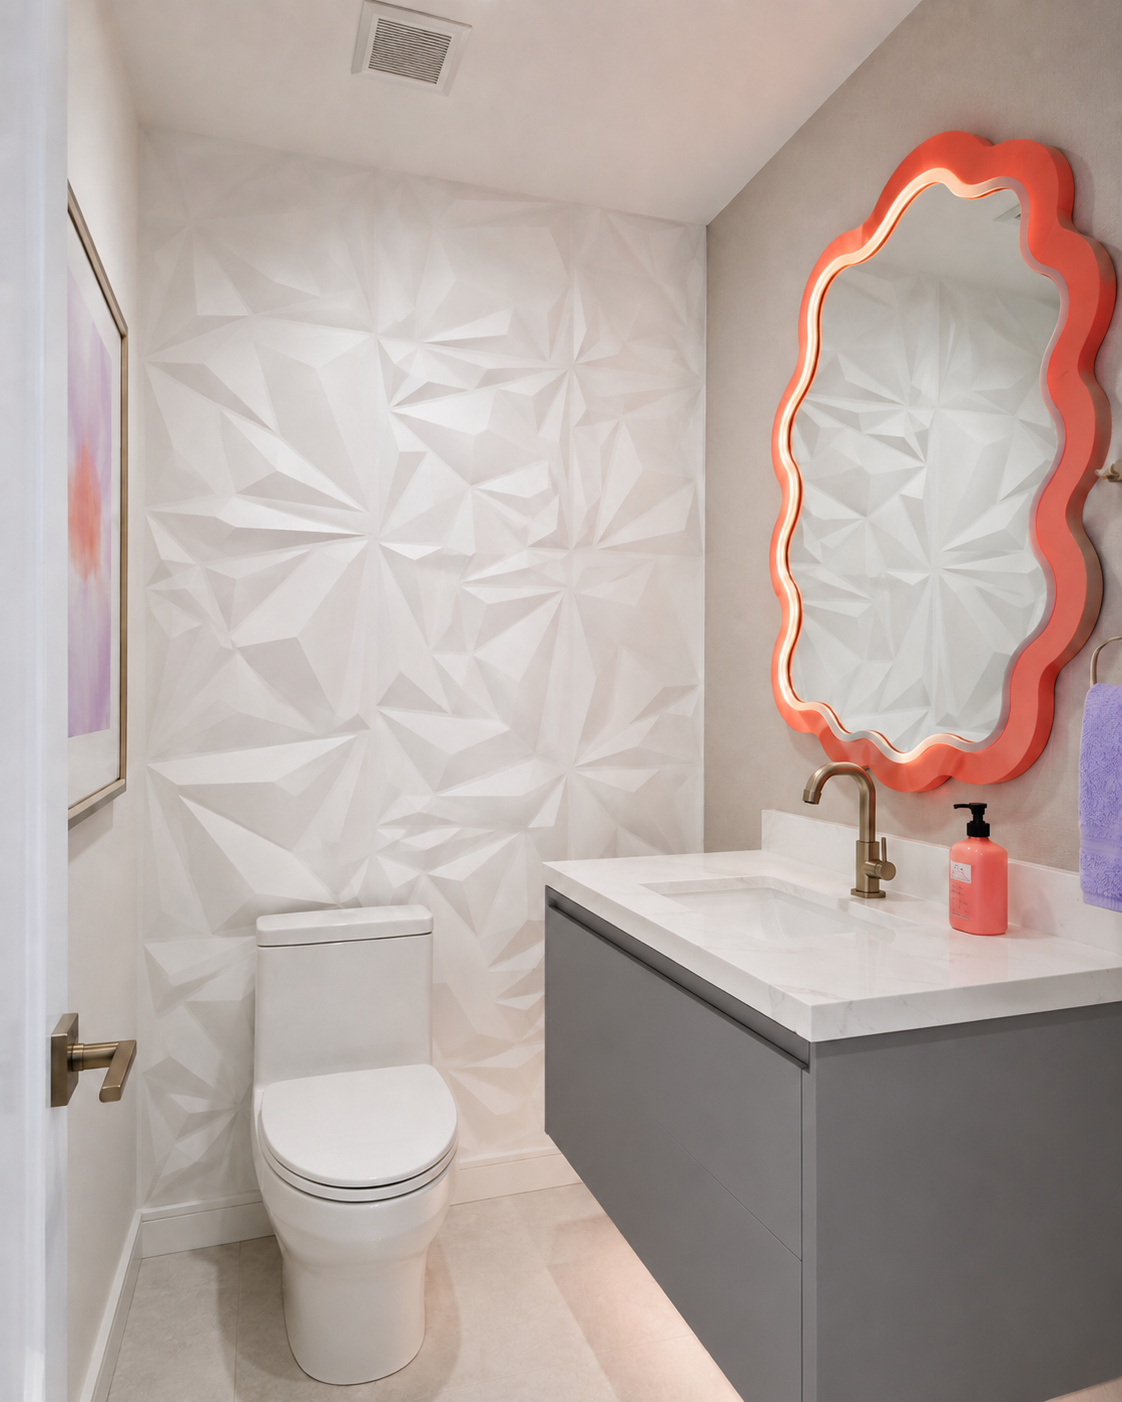
Relief tile usually needs raking light to register. Panels this deep are the exception, since the facets are angled steeply enough to shadow themselves under ordinary ceiling light, which is what lets a white wall keep this much definition.
There are two honest drawbacks to this texturized wall idea. The valleys collect dust in a way flat tile does not, and this look moves in and out of fashion faster than anything else in the article, so plan on a 5 to 7 year run rather than a permanent decision. A powder room is the right place to take that bet.
Plaster finishes build into the wall surface itself, and a good one looks original to the house. The category also has the widest range in labor quality, so the applicator matters more here than the material does.
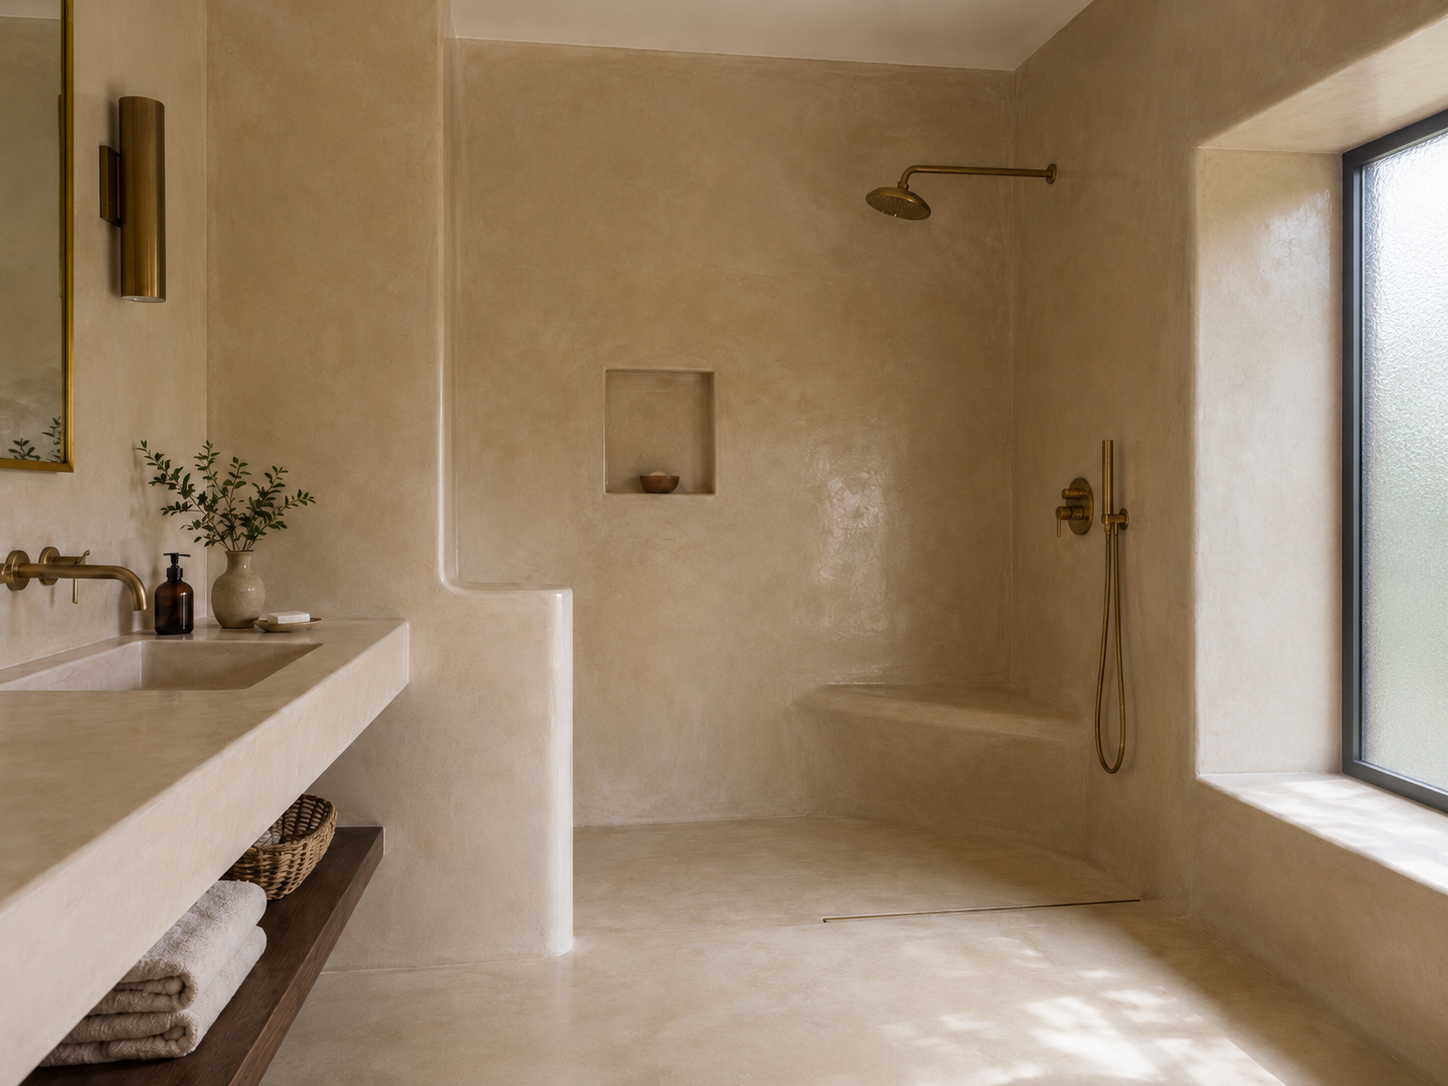
A troweled lime or microcement finish carried across walls, floor, shower, bench, and sink surround removes almost every grout line and hard edge in the room. The curved half wall dividing the vanity from the wet area is only possible in a monolithic finish, since a tiled version of that curve would need dozens of cut pieces. Budget $15 to $30 per square foot installed, and hire someone who does this work exclusively.
A microcement shower asks more of the installer than any other finish covered here, and for most homeowners it is still a worse bet than tile. Tile fails locally and visibly, so a dark grout line or a hollow-sounding tile tells you where the problem is and a setter cuts out a square foot. A continuous plaster shower has no equivalent tell. Water reaches the substrate through a pinhole in the topcoat and stays there until a stain appears on the ceiling below, and the repair by that point covers the whole wall. Price that risk in before you sign off on the finish.
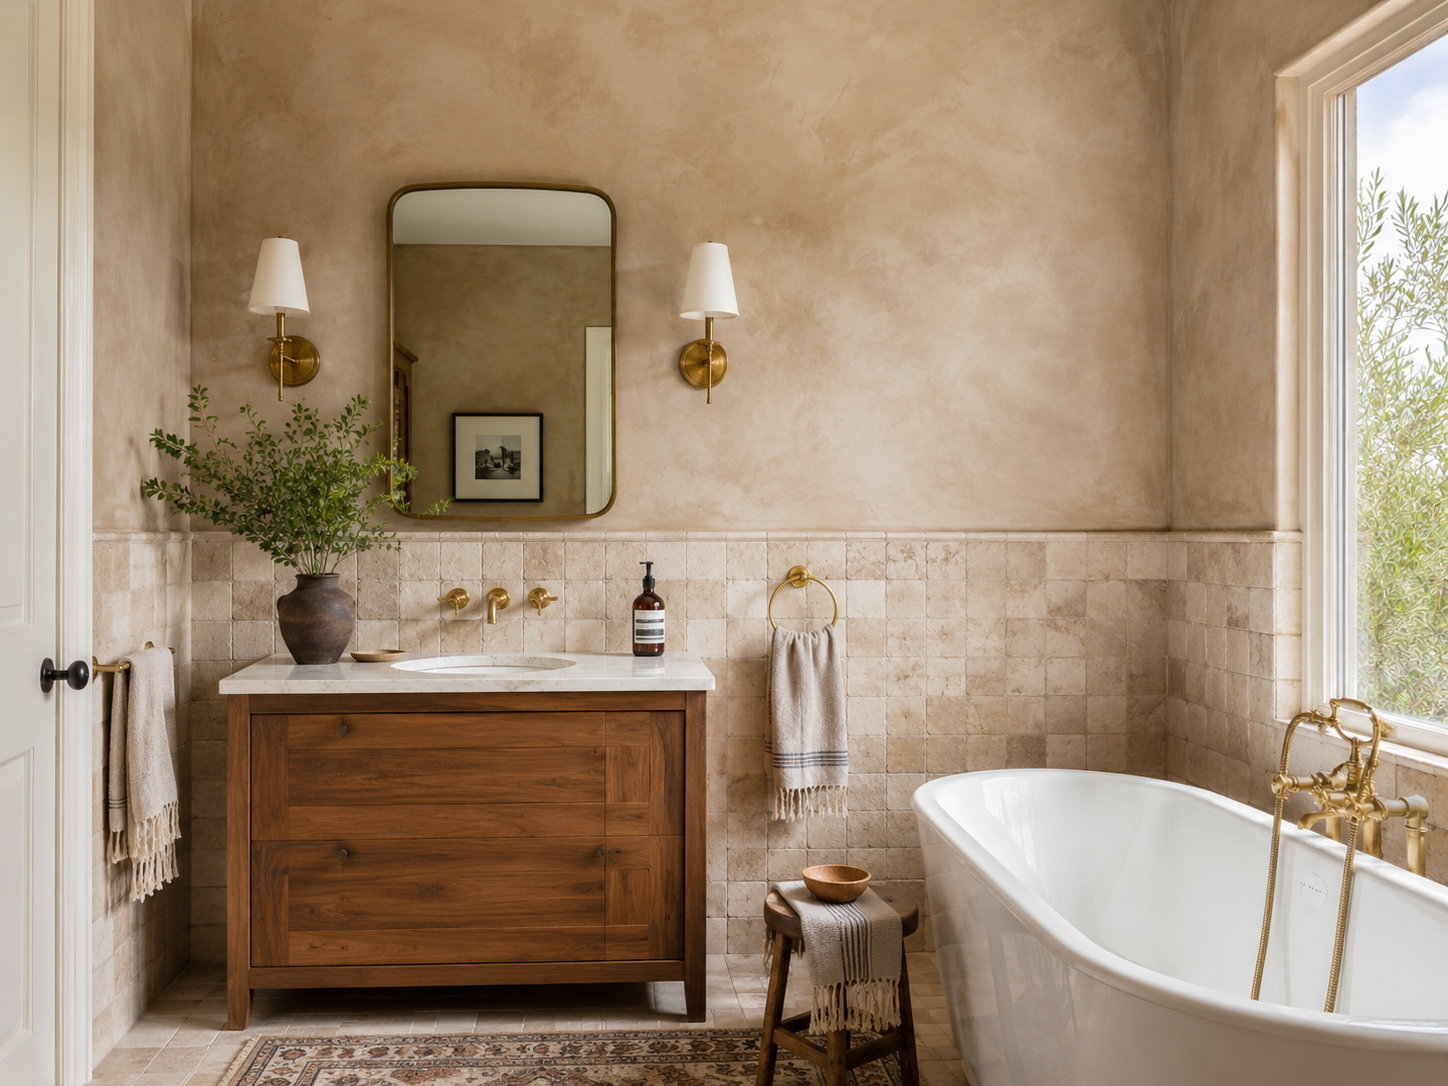
Limewash gives you the cloudy depth of plaster at a fraction of the price, since it goes on in two thin coats over primed drywall rather than building thickness. Pairing it with a tumbled travertine wainscot puts the durable material where water lands and the delicate one above the splash line. The color shift between the two is small, so the wall still looks like a single surface with a change in texture.
Plan on $2 to $6 per square foot over a properly primed wall.
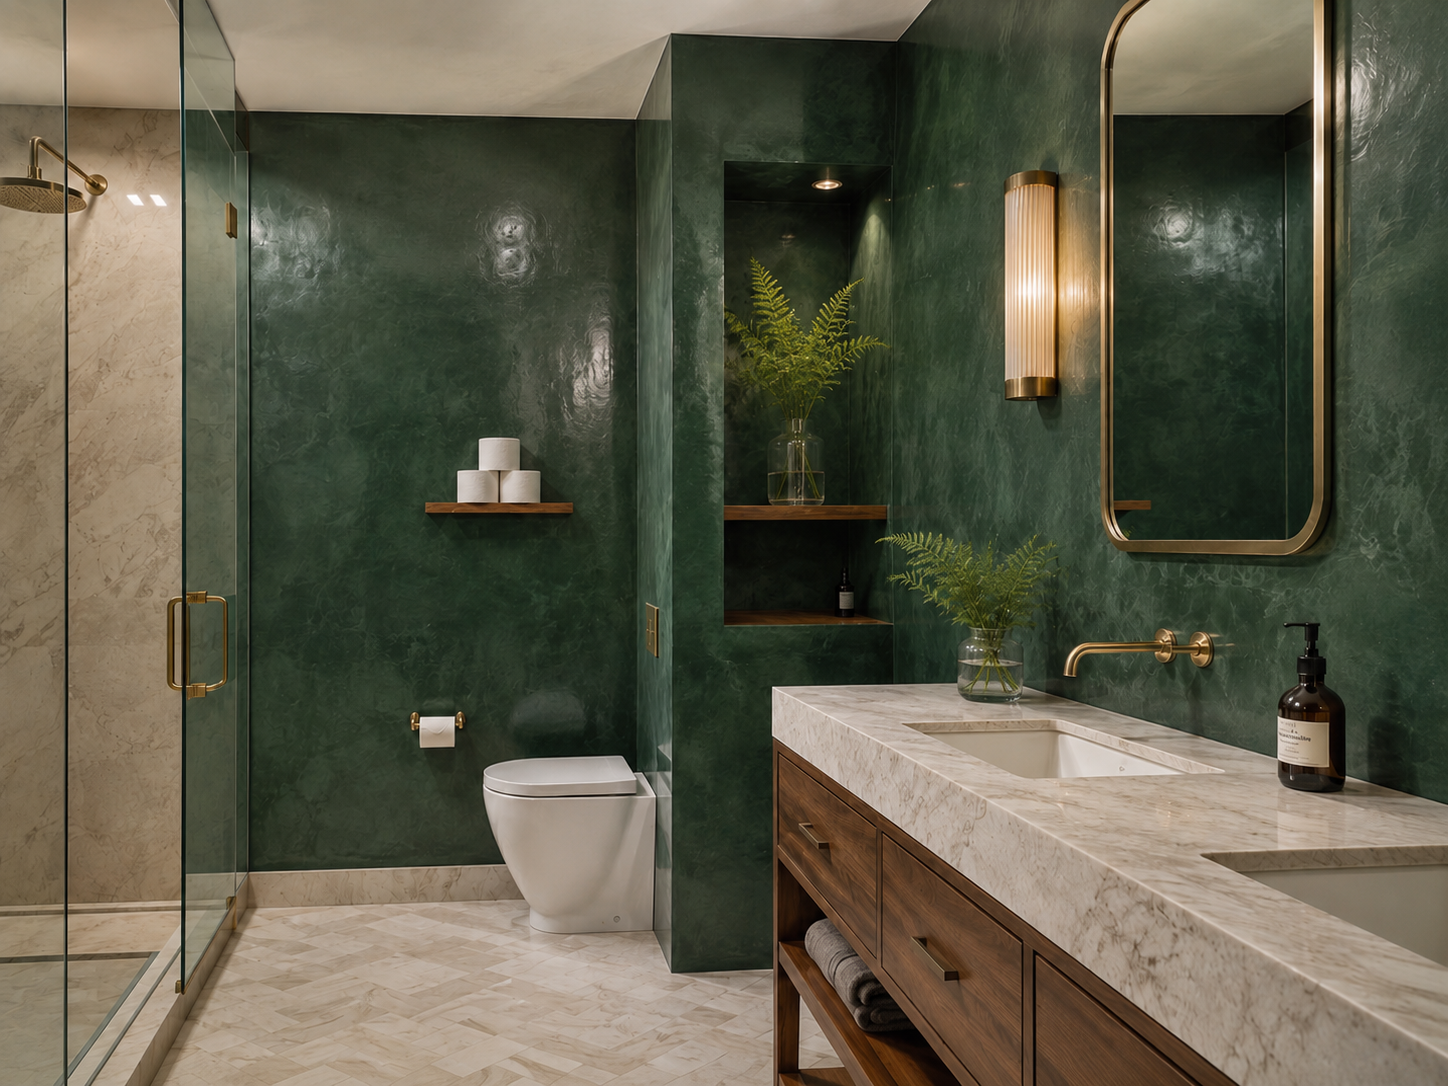
Burnished plaster in a deep color has a wet-looking depth that paint cannot reproduce, and the polish makes it more wipeable than a matte plaster of the same thickness. This bathroom carries the green across the walls, up onto the ceiling, and into the recessed niche, then stops at the shower opening. Marble tile takes over inside, where water hits the wall directly. Wall sconces mounted close to the surface show the cloudiness in the finish that overhead lighting would flatten.
Expect $8 to $15 per square foot installed. Keep it off any wall that will eventually take an anchor for a towel bar or shelf, since a patch in a polished dark finish is nearly impossible to hide.
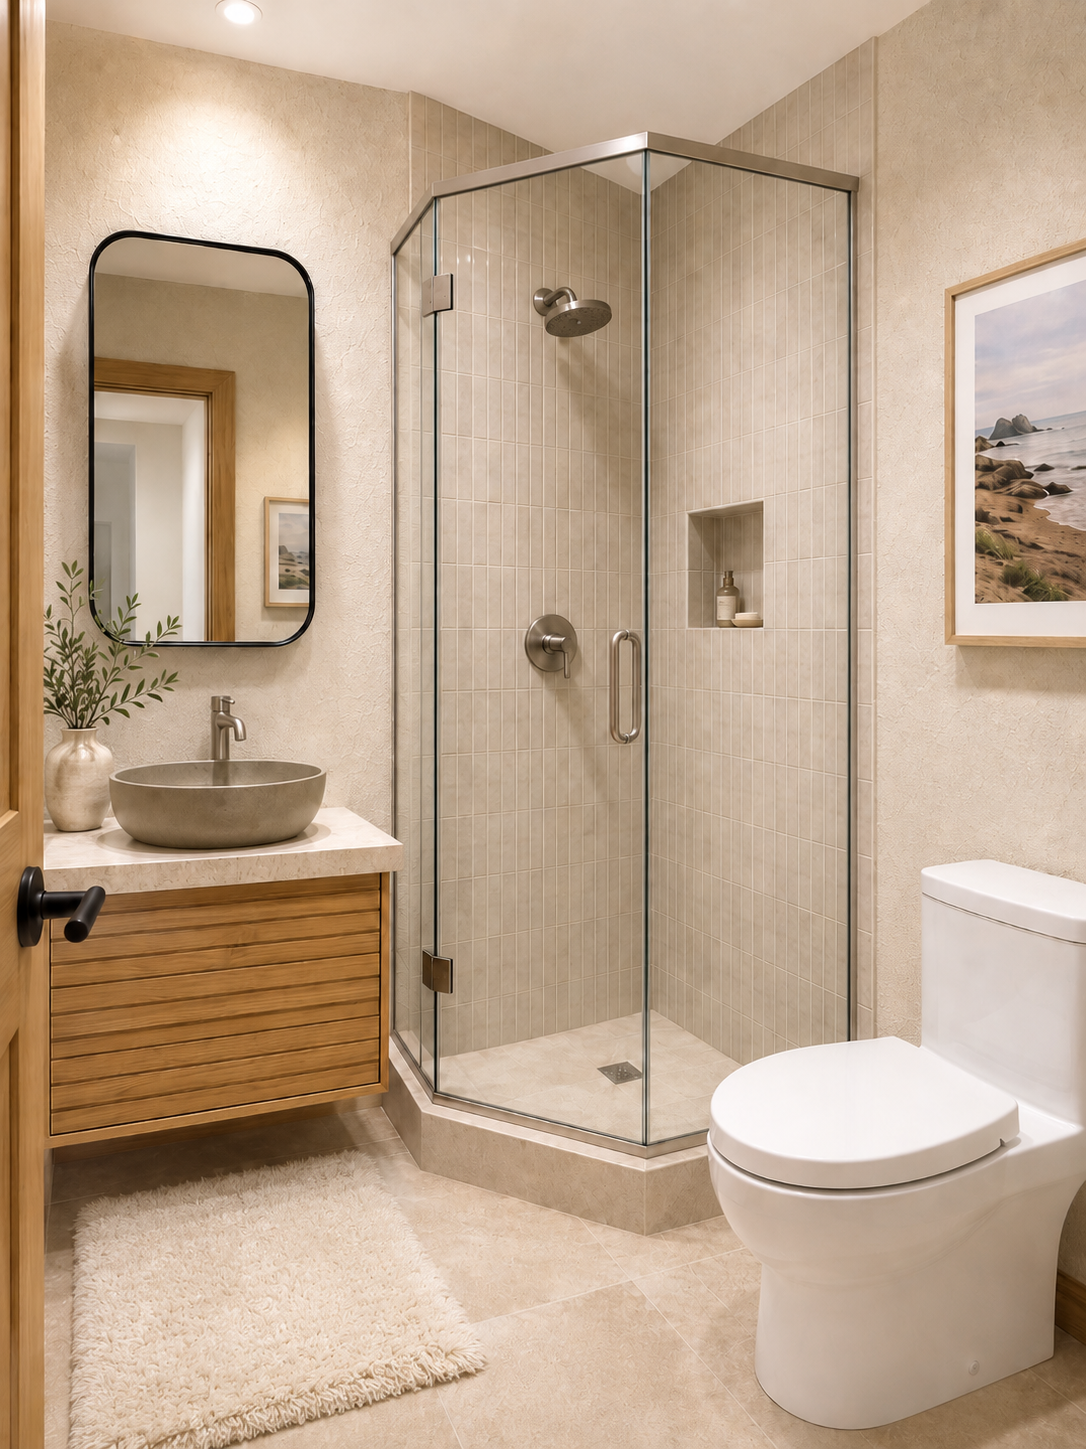
A fine stipple on the walls outside the shower adds enough surface interest to keep a neutral bathroom from feeling like a hotel room, and it hides drywall imperfections in an older house where the walls are not perfectly flat. This is the option to pick when the shower already has a strong tile and a second loud texture would crowd the room.
The strongest argument for knockdown has little to do with how it looks. In a house built before about 1970, the walls are rarely flat, and bringing them to a smooth finish means skim coating the entire room. Texture covers the same imperfections at a lower price. Contractors working in older housing stock suggest it for that reason far more often than for style, and homeowners who came in asking about tile are frequently talked into it on cost alone.
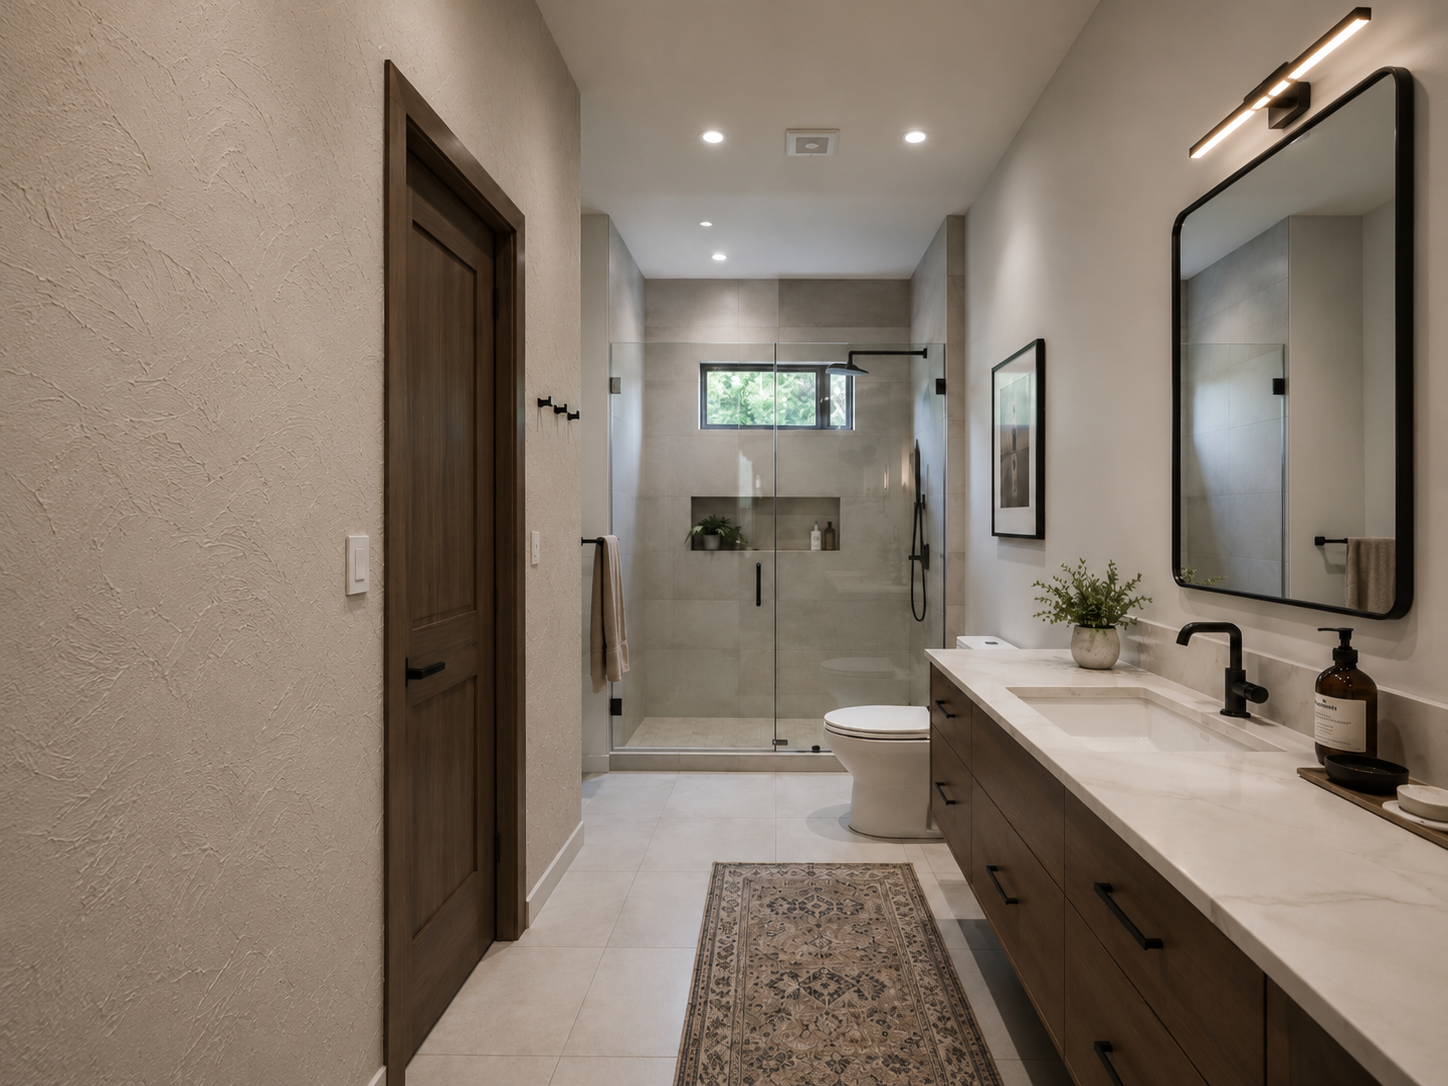
Knockdown is the least expensive way to texture bathroom walls, and it is the finish most people picture when they think of wall texture at all. Applied here to the long entry wall, it gives a narrow galley bathroom something to look at on the side with no fixtures, while the shower and vanity walls stay smooth or tiled. Limiting it to one wall avoids the 1990s builder-grade association that heavy texture on all four walls carries.
Knockdown, orange peel, and skip trowel run roughly $1 to $3 per square foot installed. All three are joint compound products, and none of them belong inside a shower or tub surround.
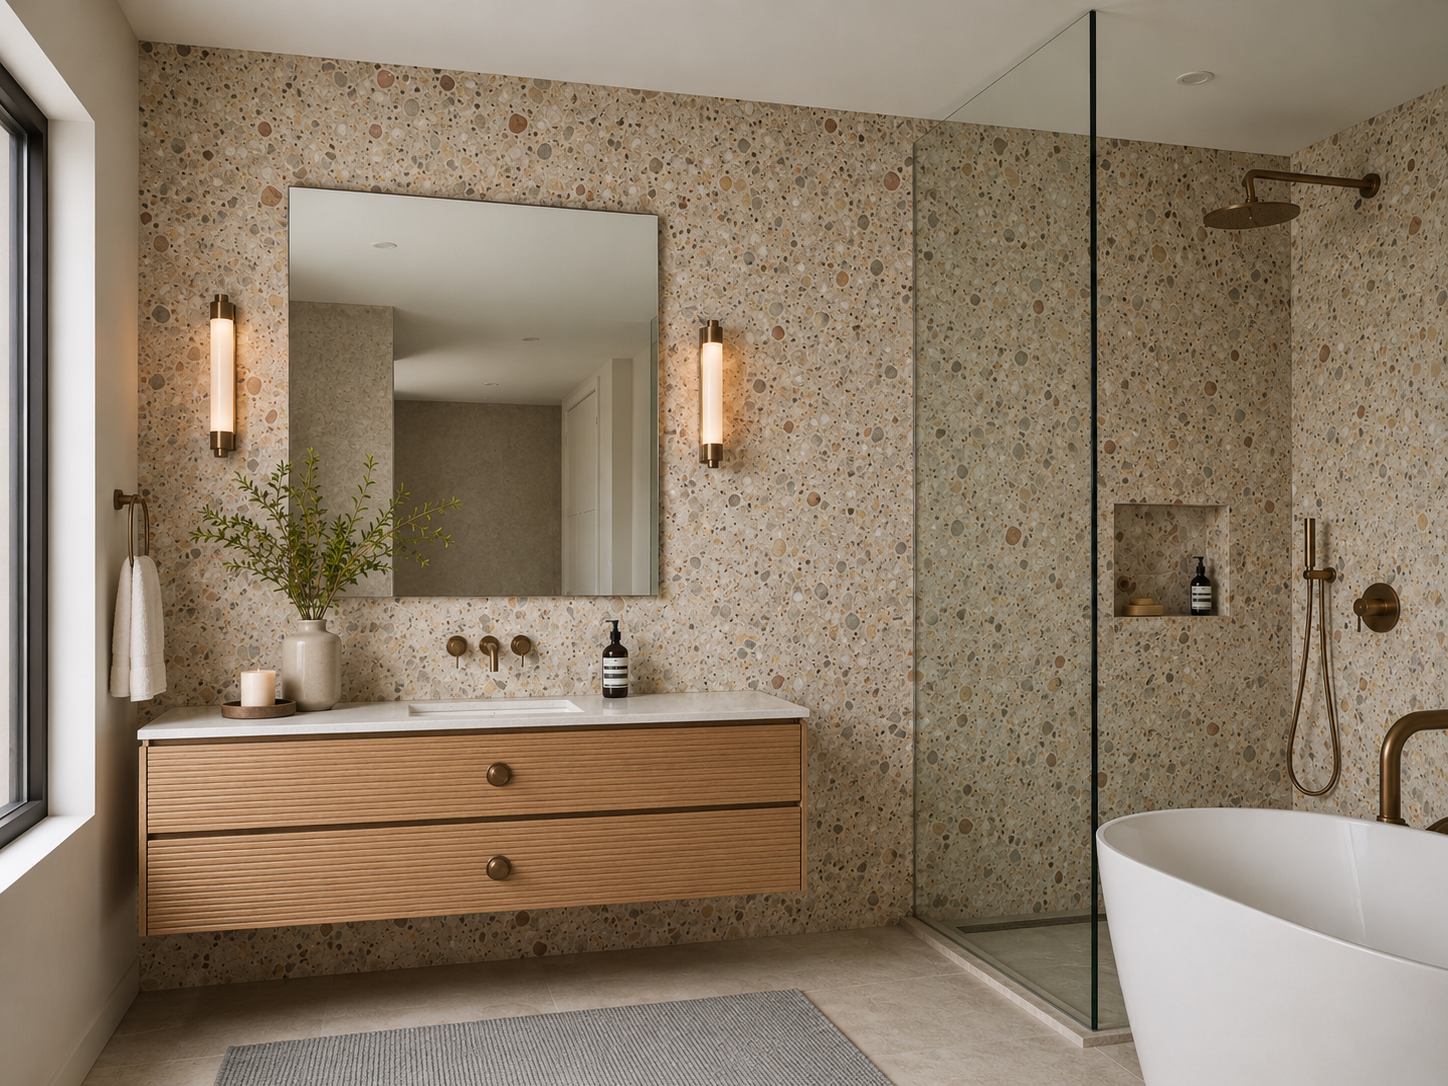
Large-format aggregate and terrazzo panels give you a heavily patterned wall with almost no grout, so a busy surface does not also become a cleaning burden. Running the same slab behind the vanity and through the shower ties the two zones together, and the freestanding tub and floating vanity sit against it as simple shapes.
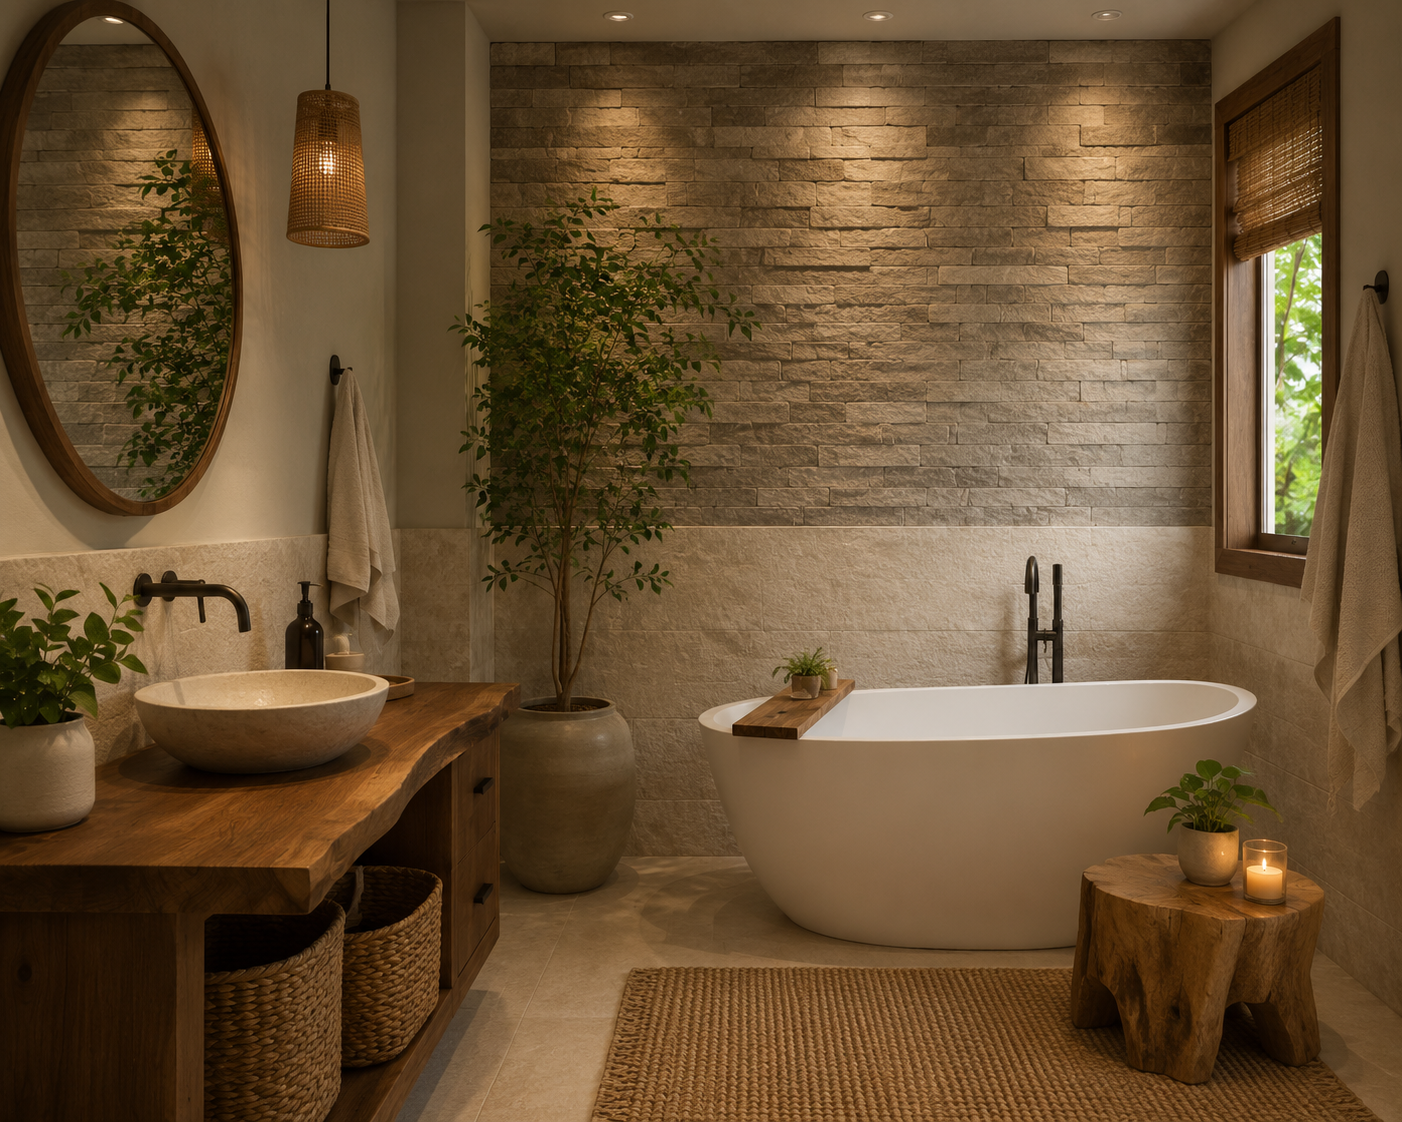
Split-face stone carries the deepest profile of any finish you would put on a bathroom wall, with shadow lines an inch or more from face to back. Stacking it only on the upper wall and running smooth large-format stone below keeps the rough material off the surfaces people touch and lean against, and the horizontal break stops a heavy texture from swallowing the room. The downlights here do the real work. Aimed straight down the face, they rake across every ledge and throw the shadows that make the wall worth its cost, and the same wall under a flush ceiling fixture would look like gray tile.
Ledger panels run in the same range as mid-grade porcelain, but installation costs more because the pieces are heavy and the courses have to be shimmed level as they stack. A freestanding tub filled to the overflow will splash the lower wall, so the smooth stone below the break is doing more than a visual job.
Wood belongs in the driest bathrooms and the driest zones. Half baths and powder rooms have no shower and no steam, so millwork holds up there indefinitely.
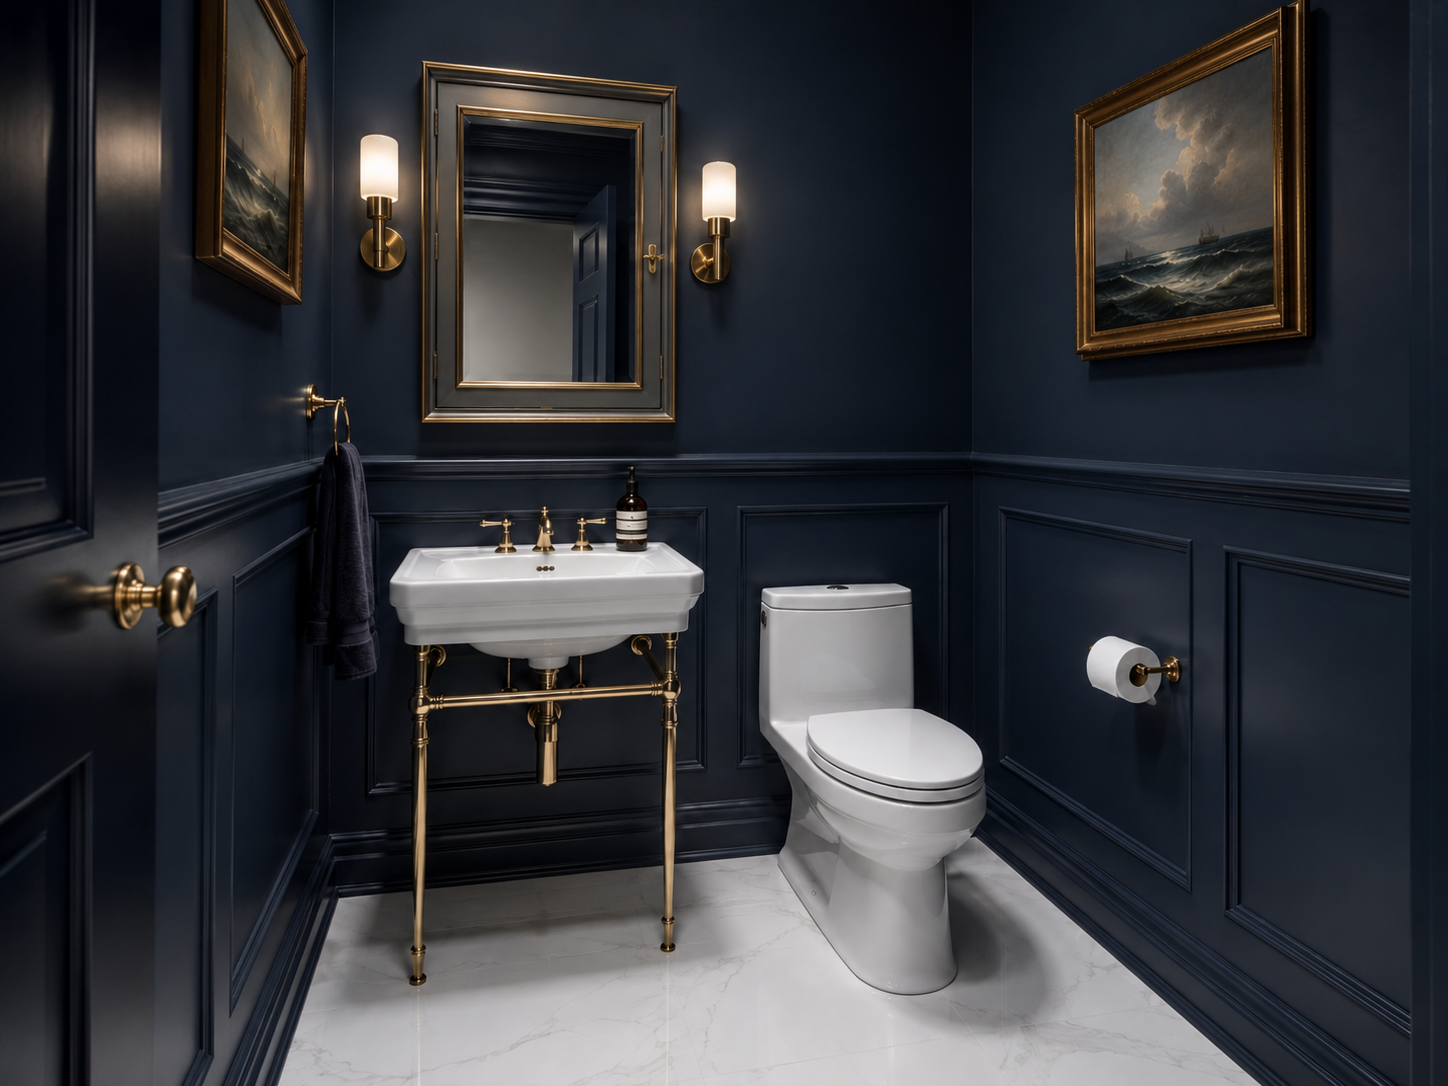
Applied picture-frame molding painted the same color as the wall creates texture through shadow instead of material, and it costs less than any tile or plaster option here. A powder room suits it because there is no moisture load, and the small square footage lets a high-drama color like this navy stay interesting rather than turning oppressive. Painting the molding, the wall, and the door in one color removes the contrast that would otherwise make the panels look like applied trim.
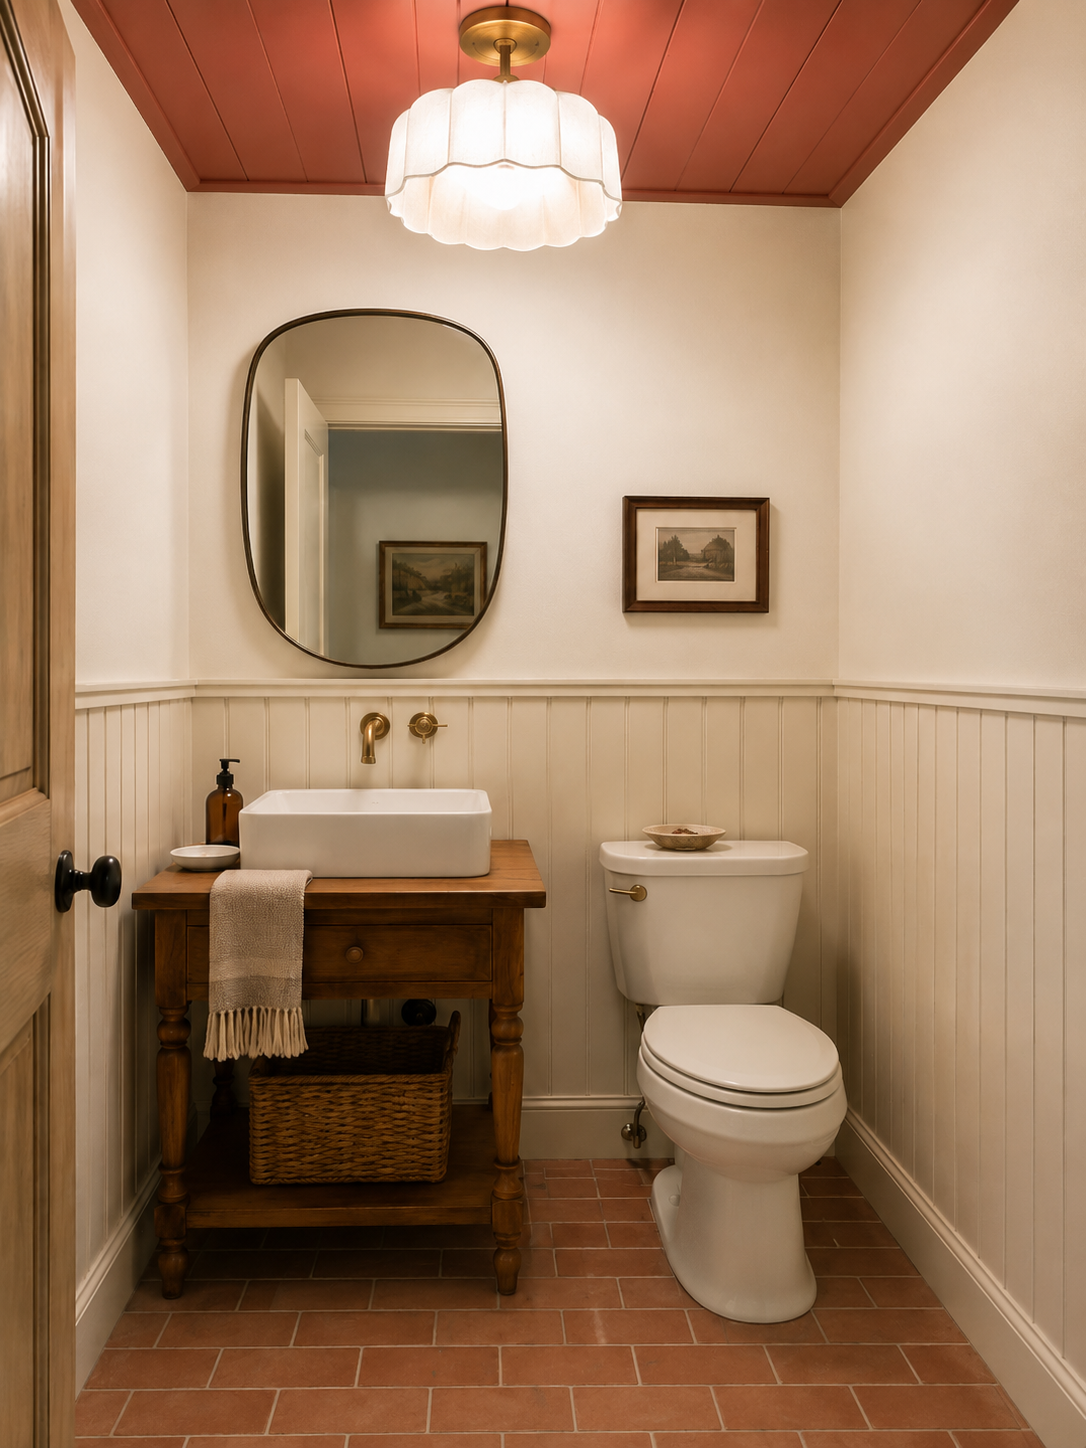
Beadboard installs fast and repairs easily, since a damaged board can be pried out and replaced without touching the rest of the wall. This powder room runs it past the toilet tank, closer to 42 inches than the usual 36, which gives a narrow space a strong horizontal line and enough coverage that the paneling does not look like an afterthought. Painting the plank ceiling terracotta adds a second millwork texture overhead while the walls stay plain.
Installed cost typically runs $7 to $15 per square foot. Three details separate a bathroom installation from a hallway one:
Full bathrooms need one more decision: the wall the shower shares gets tile, not board.
The regrets show up in maintenance and repairs, usually a year or more after the install.
Soap scum, mildew, and hard water minerals settle into the low points of a textured surface and stay there. A flat wall wipes down in one pass, while a heavy knockdown or stomp finish within a few feet of the shower needs a soft brush and more time. Abrasive pads speed that up and wear down the high points unevenly.
Every bathroom eventually needs a hole in a wall for a shutoff valve, a leaking supply line, a towel bar in the wrong spot, or a vanity swap that leaves the old backsplash outline exposed. Hand-troweled finishes are difficult to reproduce, and Venetian plaster repairs often mean reworking the full wall to blend.
Going back to smooth means skim coating, sanding, and priming, and heavy profiles need two coats to level out.
Agents flag heavy 1990s swirl and stomp patterns as a sign that a bathroom has not been updated in decades, and that puts the whole room in a buyer's renovation column. The bathroom wall texture ideas that age best are the restrained ones: limewash, fine plaster, and subtle sand finishes hold up in listing photos far longer than deep profiles do. If the house is likely to sell within five years, a lighter profile keeps a buyer's options open.
Design a Home That’s Uniquely Yours
Block can help you achieve your renovation goals and bring your dream remodel to life with price assurance and expert support.
Get Started
The standard recommendation is to keep texture subtle in a small room. That advice comes from bedrooms and living rooms, where a textured wall competes with furniture and art for attention. A bathroom has almost none of that. Most people are also in and out in ten minutes, too short a visit for a bold wall to get tiring. The limit in a small bathroom is cleaning access near the shower.
Joint compound texture fails inside a shower or tub surround. Anything in the splash zone needs a waterproof assembly underneath, and bathroom paint does not qualify. Paint adds mildew resistance to the face of the wall while water still reaches the substrate. Block's guide to bathroom waterproofing walks through what belongs behind the finish.
Wall and ceiling coatings installed before roughly 1980 can contain asbestos, and sanding or scraping releases fibers into a small enclosed room.
Texture in a poorly ventilated bathroom shows mildew at the ceiling line within a year or two, and no upgrade to the material compensates for that. Size the fan at roughly 1 CFM per square foot for bathrooms up to 100 square feet, with 50 CFM as the practical minimum, and use fixture-based sizing above that, counting each shower, tub, and toilet.
Running the fan for 20 minutes after a shower ends does more for the life of the finish than any premium coating, and it costs roughly $25 to add a timer switch during the electrical rough-in.
Two crews using the same product can deliver very different walls. Vetting the applicator and approving a sample on site protects against the bad version.
The wall gets repaired and primed first, then the applicator mixes joint compound or plaster to the consistency the product specifies and applies it in sections small enough to finish before the material sets. Knockdown and orange peel are sprayed and then worked with a knife, while plaster and limewash are troweled or brushed in two or more coats. Anything in a wet zone needs its waterproof membrane installed before the finish goes on, and most bathrooms take one to three days depending on the material and the number of coats.
Tadelakt, Venetian plaster, and Roman clay reward technique more than product selection. Crews that offer these finishes as an add-on to standard drywall work produce uneven results more often than dedicated plasterers do, so ask who will physically be on the wall.
Light raking across a textured wall from a sconce or a window exaggerates trowel marks, lap lines, and uneven pressure, and higher sheen paint magnifies all of it. Require a sample at least 2 feet by 2 feet on the wall in question, then look at it twice: once at night under the bathroom's own fixtures, once in daylight. Anything smaller hides the lap lines you are trying to catch.
Finding a contractor who has done your specific finish before matters more than which product you pick. Block matches your project with vetted local contractors, puts every scope through an expert review to catch missing line items before work starts, and holds payments until milestones are approved. Tell Block what you are planning and see which contractors in your area compete for the job.
Remodel with confidence through Block
Connect to vetted local contractors
We only work with top-tier, thoroughly vetted contractors

Get expert guidance
Our project planners offer expert advice, scope review, and ongoing support as needed
Enjoy peace of mind throughout your renovation
Secure payment system puts you in control and protects your remodel

Renovate confidently with Block
Easily compare quotes from top quality contractors, and get peace of mind with warranty & price protections.
Bathroom
York City Bathroom Remodel: Costs, Planning & Design
09.17.2026
Bathroom
Walk-In Tub vs. Walk-In Shower for Seniors
09.16.2026
Cost
The Cost to Add a Half Bath & How to Plan for It
09.04.2026
Bathroom
Non-Tile Bathroom Flooring Options
08.26.2026
Design
Bathtub to Shower Conversion: Cost, Ideas, Examples & More
08.11.2026